


16
16
The monitor will remember the settings obtained by the auto calibration
settings and use them whenever you turn the monitor on. Note that you may
need to readjust the monitor if it is connected to a different computer or if the
computer’s graphics adaptor is replaced.
If you are still not satisfied with the result, you can enhance the image by using
the monitor’s manual adjustment functions.
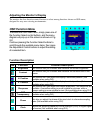
Manual Picture Adjustment
Adjustments to the displayed image and audio volume are made using the
On-Screen Display (OSD), and the buttons on the front of the monitor.
To manually adjust the image:
1. Display your operating system desktop
2. Open the OSD menu by pressing one of the Function keys on the monitor.
3. Press Fn► or ◄ to select the Clock function.
4. Press ► or ◄ to increase or decrease the sampling clock to get the
optimum picture. Look closely at the picture displayed, especially
surrounding text and icons, for any movement or change. Adjust the Clock
setting and see how this affects this “noise” or movement. Make sure that
in correcting noise in one part of the screen the setting does not create it in
another. You should, with careful adjustment, be able to obtain a picture
with no visible noise in any section of the screen.
5. If some noise or distortion is still visible select Phase using the Fn► or ◄
buttons.
6. With the Clock set to the optimal value adjust the Phase to further optimise
the displayed image. You should now be able, with a combination of the
Phase and Clock settings, to obtain a perfectly stable image.
7. Finalise the manual adjustment using the H. Position and V. Position
functions
If you are still not satisfied with the result, try repeating the above procedure
using a graphics signal that has a different refresh rate.