


2
Connecting The DFL-200 Network
Security Firewall To Your Network
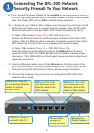
A.
First, connect the power adapter to the
receptor
at the back panel of the DFL-
receptor at the back panel of the DFL-receptor
200 and then plug the other end of the power adapter to a wall outlet or power
strip. The Power LED will turn
ON
to indicate proper operation.
B.
1. Power off your Cable or DSL modem; some devices may not have a on/off
switch and will require you to unplug the power adapter. Now, the DFL-200
should be powered on and the Cable / DSL modem should be turned off.
2. Cable / DSL modem (Power Off
) – DFL-200 (Power On)
Connect an Ethernet cable to the Ethernet jack located on the Cable / DSL
modem. After the Ethernet cable is securely connected, power on the Cable /
DSL modem by turning on the unit or plugging in the power adapter.
3. Cable / DSL modem (
Power On) – DFL-200 (Power On)
Insert the other end of the Ethernet cable to the WAN port on the back
panel of the DFL-200. The WAN LED light will illuminate to indicate proper
connection. If the WAN LED is not illuminated, please go back to step B and
repeat its instructions.
C.
Insert an Ethernet cable to one of the
LAN ports on the back panel of the
DFL-200 and connect it to your internal network host. The LED light for the
LAN port on the DFL-200 will illuminate to indicate proper connection
D.
Connect the computer that you will use to confi gure the DFL-200 to the
network hub or switch.
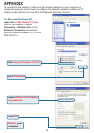
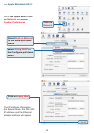
WAN port
This is for
the connection of an
Ethernet cable to the
Cable or DSL modem.
COM Port
Used to
connect to the CLI.
Receptor for
Power Adapter
.
LAN ports
These are
for connecting Ethernet
cables to internal
network hosts.
DMZ port
This is for
the connection of an
Ethernet cable to the
DMZ network.
Reset
system
settings to
factory defaults