


Installation Installation
Adjust angle of Tilt stand
Installation
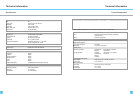
esaB * ediuG s'resU * rotinoM DCL *
* Monitor-to-PC VGA Cable * Monitor-to-PC DVI-D Cable (optional by model type)
droC rewoP *
* Monitor-to-PC "Up to Down" USB cable(optional by model type)
Before unpacking the LCD Monitor, prepare a suitable workspace for your Monitor and computer. You need a
stable and clean surface near a wall power outlet. Make sure that LCD Monitor has enough space around it for
sucient airow. Though the LCD Monitor uses very little power, some ventilation is needed to ensure that the
Monitor does not become too hot.
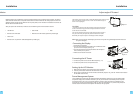
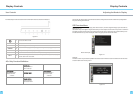
After you unpack the LCD Monitor, make sure that the following items were included in the box:
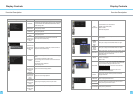
The monitor screen may be tilted (-5 to 40 degree).The place hands on each
side of the monitor screen and lift or lower to the desired height as
shown in the right gure.
20
o
5
o
Figure 1-1
CAUTION:
* To lower the monitor screen place hands on each side of the monitor
screen to avoid catching your hand and ngers between the monitor
screen and the tilt stand base.
*Do not push surface of the monitor screen strongly and not scratch it
with your nails when you adjust the position of the monitor screen.
Otherwise you might be injured or the display could be damaged.
Note:
When you tilt the monitor pass 40 degrees, you will hear clicking noise. Tilting pass 40 degrees becomes harder than
tilting within 40 degrees.
.
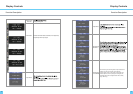
Connecting the Display
1. Power o your computer.
2. Connect one end of the signal cable to the LCD Monitor’s VGA
port or DVI-I or DVI-D port. (See Fig 1-2)
3. Connect the other end of the signal cable to the VGA port or
DVI-I or DVI-D port on your PC.
4. Make sure connections are secure.
Figure 1-2
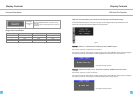
Connecting the AC Power
1. Connect the power cord to the LCD Monitor.(See Fig. 1-3)
2. Connect the power cord to an AC power source.
AC Power Jack
Power Cord
Figure 1-3
Setting Up the LCD Monitor
1. Make sure the AC power cord is connected to the LCD Monitor.
2. Press the power button located on the bezel of the monitor.
3. Once a signal is received, the monitor should automatically adjust. If not, push the “AUTO” button located
on the bezel of the monitor.
Power Management System
This LCD Monitor complies with the VESA DPM Power Management guidelines. If you have VESA's DPM™
compliance display card or software installed in your PC, the monitor can automatically reduce its power
consumption when not in use. If input from keyboard, mouse or other input devices is detected by the
computer, the monitor will automatically "wake up". When the LCD Monitor is in power saving mode, the
monitor screen will be blank and the power LED indicator will light yellow.