220 V Revelationby DRAPER Page 3 of 8
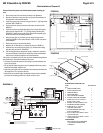
should be secured into place using the eight projector stand offs pro vid ed. Two
of the standoffs have a removable hook and loop material to be used at the
rear of the projector for ease of removing the projector. The stand offs will en-
sure proper re lo ca tion of the pro jec tor after periodic main te nance or repair to
the projector. Just peel the adhesive backing from the bottom of the stand offs
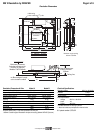
and place them around the projector as shown in the di men sion al diagram.
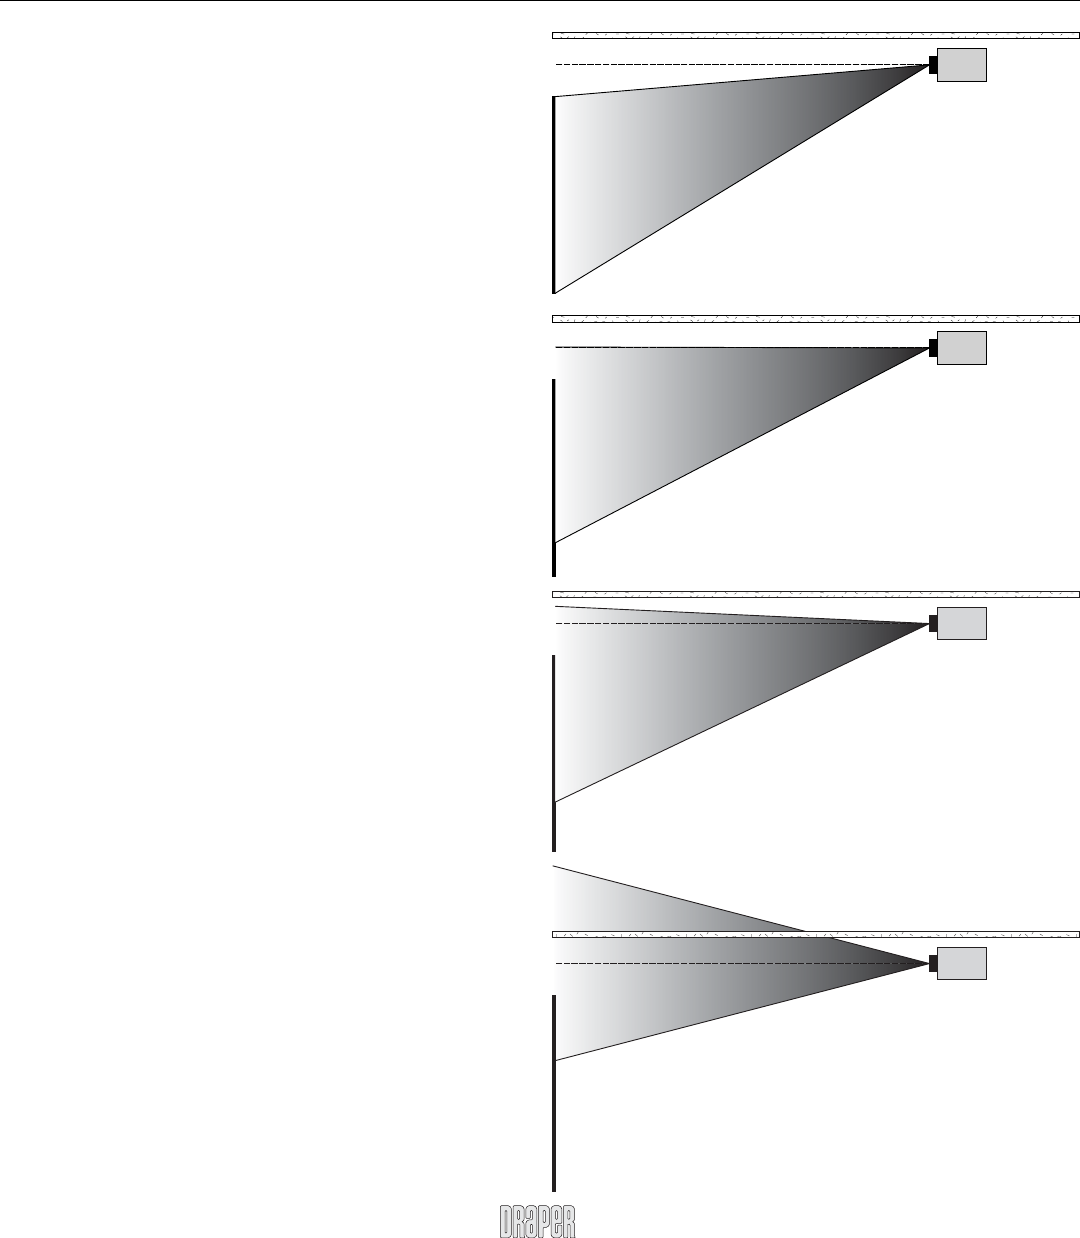
A light path is the projector’s spread of light and its relationship to the cen-
terline of the lens. Since the Revelation folds a light path twice (bounces the
image off of two fi rst surface mirrors), it’s critical to un der stand your projector’s
light path to know approximately where the image will land on the wall. Con-
sult the projector's manufacturer to determine its light path geometry.
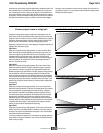
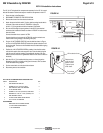
Single lens projectors fall into one of four categories of light path ge om e try as
depicted in the illustrations at right.
Light Path A
Single lens projectors with light path geometry “A” work well with the Rev e -
la tion. Since the light is already projecting at a downward angle to the cen-
terline, the image is projected further down on the wall resulting in a lower
installation point for the projection screen. A projector with Light Path A
mounted in the Revelation projects a light path similar to the same pro jec tor
ceiling mounted with the centerline of its lens mount ed ap prox i mate ly 51-
76mm (2"-3") below the ceiling.
Light Path B
Single lens projectors with light path geometry “B” will work with the Rev e -
la tion within certain limitations. The upper edge of the image runs parallel
to the centerline of the lens. A projector with Light Path B mount ed in the
Revelation projects a light path similar to the same projector ceiling mount ed
with the centerline of its lens mounted ap prox i mate ly 153-203mm (6"-8")
below the ceiling. By using the built in adjustment features of the Rev e la tion,
you should be able to bring the top of the image below the ceiling. Adjusting
the ceiling closure door may introduce a keystone effect to the image. If your
projector has a keystone correction feature you may be able to compensate
for keystoning.
Light Path C
Single lens projectors with light path geometry “C” will work with the Rev e -
la tion within certain limitations. The portion of the image above the centerline
of the lens projects at a gradual angle up towards the ceiling. A projector
with Light Path C mounted in the Revelation projects a light path similar to
the same projector ceiling mounted with the centerline of its lens mounted
approximately 153-203mm (6"-8") below the ceiling. By using the built in
ad just ment features of the Revelation, you should be able to bring the top of
the image below the ceiling. Adjusting the ceiling closure door may in tro duce
a keystone affect to the image. If your projector has a keystone correction
feature you may be able to compensate for keystoning.
Light Path D
Single lens projectors with light path geometry “D” will not work with the Rev-
elation. The portion of the image above the centerline of the lens projects at
too steep of an angle to be lowered below ceiling level, even with the adjust-
ment features built into the Revelation.
*Consult your projector manufacturer if in doubt about its light path ge om e try,
throw distance or projector dimensions. Also, be sure your projector has the
ability to invert its image.
Choose a projector* based on its light path
B
C
D
A
Important: Once the adhesive is placed onto the surface of the inner pan it is
very diffi cult to remove. It is very important to plan ahead when placing these
standoffs around the projector.
www.draperinc.com
(765) 987-799
9


