


3
Introduction
The Dymo 9000 Electronic Labelmaker enables you to
create a wide variety of high quality self-adhesive
labels. These instructions describe how to use your
Labelmaker in stand-alone mode; for PC-Link operation
consult the relevant sections of the Dymo Label
Software manual.
The Labelmaker uses 6mm (
1
/
4
"), 12mm (
1
/
2
"),
19mm (
3
/
4
") 24mm (1") or 32mm (1
1
/
4
") wide tape
cassettes in a number of label colours. Labels can be
tab-cut for easy removal from the backing tape.
Text can be printed horizontally or
in a variety of sizes and styles and can be left-justified,
right-justified or centred on the label.
Warranty Registration
Please complete the warranty registration card and
return it to your national customer service address
within seven days – see the warranty booklet for
details.
Power Supply
AC ADAPTOR
• Connect the AC adaptor to socket A➊.
Use only the special AC adaptor designed for the
DYMO 9000 Labelmaker.
• An internal battery will retain memory settings for up
to three months. The battery is charged while the
Labelmaker is connected to the AC adaptor.
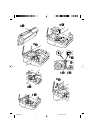
Changing the cassette
• Ensure that tape and ribbon are taut across mouths
of cassettes (wind the ink ribbon cassette on a little if
necessary before inserting cassette).
• Insert tape cassette
B➊ as shown.
• Insert correct ink ribbon cassette
B➋ as shown.
Note – interlocks C➊ prevent you from inserting a
19mm (
3
/
4
") ink ribbon cassette with a 24mm (1") or
32mm (1
1
/
4
") tape cassette.
• Insert cassettes with tape and ribbon positioned as
shown between pinch roller
C➋ and print head C➌.
• Ensure tape and ribbon are positioned correctly.
• Ensure that the lid is closed correctly or printing will
not start.
• A sensor detects if a label is left in the cutter area.
When this occurs further printing will be prevented
until you remove the label. See ‘Troubleshooting’.
• When you change to another cassette size, the
Labelmaker will prompt you to select the correct tape
width installed – see CASSETTE in the SET UP
function menu.
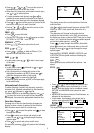
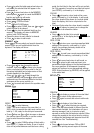
The Display
The display shows:
• A ‘WYSIWYG’ representation of the label you are
creating in edit mode and menus for selecting
functions and features.
• A status bar at the bottom of the display.
UK
v
e
r
t
i
c
a
l
l
y
WYSIWYG
DISPLAY
STATUS BAR
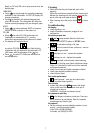
Function keys
ON/OFF
Switches the power on and off.
• Switches off automatically after ten minutes if no keys
are pressed. The last label created will be retained and
displayed when next turned on. In addition, any stored
settings will be retained.
Note: The internal battery will retain stored settings
for up to three months.
CAPITALS
CAPS
• Press for all subsequent characters to be in UPPER
CASE (CAPITALS), as confirmed by the
CAPS
indicator
in the status bar.
• Press again to cancel and return to lower case.
SHIFT KEY
• Press and hold down before pressing an
alphabet key to produce an UPPER CASE (CAPS)
character.
• For dual purpose keys, press and hold
first to
produce the legend above the key.
• Pressing
while
CAPS
is set will give lower case
characters.
DELETE
DEL
• Press to delete the character to the left of the cursor, or
to exit certain function key operations.
CLEAR TEXT
+
DEL
CLEAR
• Press to clear all the current text but leave the text
size and other settings unchanged. Also use to exit or
clear certain function key operations.
ESCAPE
ESC
• Press to exit certain function key operations.
NEW
+
ESC
NEW
• Press to clear the workspace and return all settings
back to their default state - eg plain text, auto size, etc.
CURSOR KEYS
, , or
• Press or to move the cursor along the text,
one character at a time.
• Press and hold to scan quickly through the text.