


8
V1 13-0021
Question 11: How do I set up a wireless network without the Easy Install Wizard?
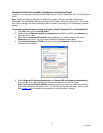
You can set up a wireless network by accessing the Web-Based Advanced User Interface.
To access the Web-Based Advanced User Interface:
1. Connect your wireless router to your modem. See Question 2 for connection instructions.
2. Set up your computer’s network settings. See Question 8 for instructions.
3. Open your Internet browser.
4. Type “192.168.2.1” into the address line, then press ENTER to access the wireless router’s Web-
Based Advanced User Interface. The wireless router’s home page opens.
Note: If you have difficulty accessing the wireless router’s Web-Based Advanced User Interface,
check your computer’s network settings. See Question 8 for more information.
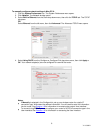
5. Click Login, or click on any one of the links on the home page to go to the login screen.
6. Enter your password or leave the password blank (the wireless router ships with no password),
then click Submit.
Note: Only one computer can log into the router at a time to make changes to the wireless router
settings.
7. When you have finished changing the settings, the Internet Status indicator in the top right
corner will read connection OK if your wireless router is set up correctly.
8. When you are finished, click Logout to exit of the Web-Based Advanced User Interface.
OR
The computer automatically logs out after a specified period of time. The default time is 10
minutes. This can be changed from 1 to 99 minutes.
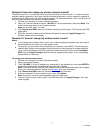
To connect your router to your Internet Service Provider (ISP):
1. Click Connection Type under the “Internet LAN” heading on the left menu. The Connection Type
page opens.
2. Click the button next to your connection type, then click Next.
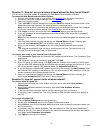
3. If your ISP gave you DNS settings, click DNS under the “Internet LAN” heading on the left menu.
You can enter DNS address entries for ISPs that require specific settings through this link. If your
ISP did not provide a specific DNS address, check the Automatic from ISP box.
4. If your ISP requires a specific MAC address to connect to the Internet, click MAC address under
the “Internet LAN” heading on the left menu. You can enter a specific MAC address or clone the
current computer’s MAC address through this link.
5. When you have finished changing the settings, the Internet Status indicator in the top right
corner reads connection OK if your router is set up correctly.
Question 12: How do I connect to the wireless network?
To connect with a Windows OS:
1. Right-click the wireless icon in the taskbar next to the clock, then select Open Network
Connections.
2. Right-click the Wireless Network Connection, then select View Available Wireless
Connections.
3. In the list of available networks, double-click the network you want to connect to.
4. If prompted, enter a network key. This is the Passkey or PSK that was created when setting up
security.
To connect with a Mac OS:
1. Click on System Preferences from the Apple menu.
2. Double-click the Network logo from the System Preferences window.
3. Select AirPort, then click the Network Name drop-down menu to select the wireless network you
want to connect to.
4. If prompted, enter the network password. This is the passkey or PSK that was created when
setting up security. If you want to connect to the network automatically the next time the network
is in range, select Remember this network.
5. Click Apply to connect to the network.