


12
V1 13-0021
Question 22: How do I restore a previous configuration?
Note: If you did not save a configuration previously, you are only able to restore factory settings. See
Question 23 for information on restoring the factory settings.
1. Open your Internet browser.
2. Type “192.168.2.1” into the address line, then press ENTER to access the wireless router’s Web-
Based Advanced User Interface. The wireless router’s home page opens.
Note: If you have difficulty accessing the wireless router’s Web-Based Advanced User Interface,
check your computer’s network settings. See Question 8 for more information.
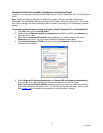
3. Click Restore Previous Settings under the “Utilities” heading on the left menu. The log in page
opens.
4. Enter your password or leave the password blank (the wireless router ships with no password),
then click Submit. The Restore Previous Settings page opens..
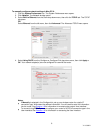
5. Click Browse. The Open window appears.
6. Locate the configuration file you want to restore, then double-click on it. A message appears
asking for confirmation that you want to restore a previous configuration.
Note: All configuration files end with a “.bin”.
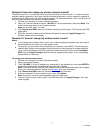
7. Click OK. A reminder window appears. It takes up to 35 seconds for the configuration restoration
to complete.
8. Click OK. A 35-second countdown appears on the screen. When the countdown reaches zero,
the router's configuration is restored. The router's home page should appear automatically. If not,
type in the Router's address (default = 192.168.2.1) into the navigation bar of your browser to
return to the User Interface.
Question 23: How do I update my wireless router’s firmware?
Firmware updates contain feature improvements and fixes to problems that may exist. When Dynex
releases new firmware, you can download it from the Dynex web site and update your router’s firmware to
the latest version.
To download and update a new firmware version:
1. Open your Internet browser.
2. Type “192.168.2.1” into the address line, then press ENTER to access the wireless router’s Web-
Based Advanced User Interface. The wireless router’s home page opens.
Note: If you have difficulty accessing the wireless router’s Web-Based Advanced User Interface,
check your computer’s network settings. See Question 8 for more information.
3. Click Firmware Update under the “Utilities” heading on the left menu. The Login page opens.
4. Enter your password or leave the password blank (the wireless router ships with no password),
then click Submit. The Firmware Update page opens.
Note: Only one computer can log into the router at a time to make changes to the wireless router
settings.
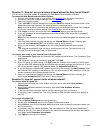
5. Click Check Firmware. The utility checks to see if there is an updated version of the firmware
available. If a new version of the firmware is available, a window opens that lets you save the
firmware file.
6. Select a name and location to save the firmware file, then click Save. Make sure that you save
the file in a place where you can locate it later. The Download Complete window opens.
7. Click Close.
8. Click Browse on the Firmware Update page. The Open window opens.
9. Browse to the firmware file you downloaded, then select the file by double-clicking on the file
name. The Update Firmware box displays the location and name of the firmware file you just
selected.
10. Click Update. A message asks if you want to continue.
11. Click OK. A message tells you that the router may not respond for as long as one minute as the
firmware is loaded into the router and the router is rebooted.
12. Click OK. A 60-second countdown appears on the screen. When the countdown reaches zero,
the router's firmware update is complete. The router's home page should appear automatically. If
not, type in the wireless router's address (default = 192.168.2.1) into the navigation bar of your
browser to return to the User Interface. The firmware update is complete.