4 EATON CORPORATION Cutler-Hammer Pow-R-Command 1000 LCD Display Instruction Leaflet IL01412010E Effective: June 2006
C. Set Group Description
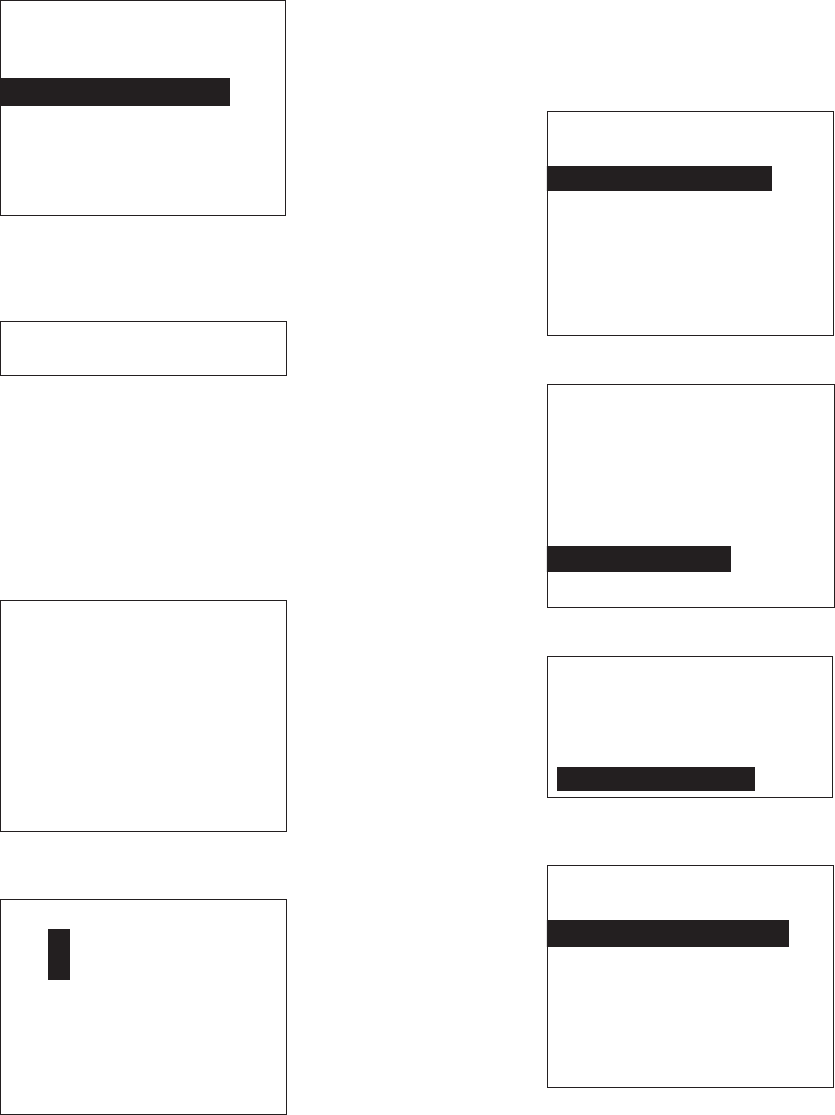
Use UP/DOWN to highlight the MODIFY DESCRIPTION option and hit
SEL. The SELECT DESCRIPTION screen will be displayed:
The list of predefined descriptions is several pages long. Use UP/
DOWN and SEL to scroll through the screens and choose a predefined
description or choose enter characters (at the end of the list) to
enter a custom description:
Use UP/DOWN to scroll up or down through the alphabet and SEL
to enter one letter at a time. Continue hitting SEL across to the right
screen of the line to enter the description.
Hit BACK once (or twice for custom desciptions) to return to the
CONFIGURE GROUP A screen.
D. Test Group
The group has now been configured and is ready to be tested. Verify
that all breaker primary handles have been returned to the ON posi-
tion. Hit BACK to return to the MAIN MENU:
Use UP/DOWN and SEL to select Command Groups ON/OFF. The
COMMAND GROUPS screen will be shown:
Use the BACK and SEL to highlight the desired group (in this case, A).
Use UP to turn the group on and DOWN to turn the group off. Verify
that the correct set of breakers is turned on and off with the group.
If not, repeat Step 4A — Configure Breaker Group A — Associate
Loads With the Group.
If there is an associated input for this group, turn the group off again
with the COMMAND GROUPS screen above. Use the actual input —
switch, motion detector, etc., to trip the input. Verify that the proper
group is turned on. If not, repeat Step 4B — Configure Breaker Group
A — Associate Inputs With the Group.
SELECT DESCRIPTION
For Group A
None
Offices_____________
Hallways
Parking
Exterior
Signs
ENTER DESCRIPTION
_ <
MAIN MENU
Command Groups ON/OFF
Panel Status Screen
Configure Groups
Configure Date/Time
Group Status:
ON: ABC N
OFF: DEFGHIJKLM OP
COMMAND GROUPS
ON: A BC N
OFF: _ DEFGHIJKLM OP
GRPA ON
Cleaning Lights
Use BACK/SEL to select
UP - ON, DOWN - OFF
Hold down BACK to exit
Verify that the group description on the fifth line of the COMMAND
GROUPS screen is the correct description for this group. If not, repeat
Step 4C — Configure Breaker Group A — Set Group Description.
5. Repeat Step 4 for each Group B through P
6. Schedule Groups
The final step in initial setup is to enter the schedules for each group.
From the MAIN MENU, select Configure Groups. The following
screen will be displayed:
Hit SEL to select Group A. The following menu is displayed:
Select Modify Schedules. The following screen is displayed:
Hit SEL to choose the empty schedule item. The following screen
is displayed:
SELECT GROUP
TO CONFIGURE:
Group A GRPA OFF
GROUP A LIGHTS
15 loads in group.
Use up/down/sel to
change selection
CONFIGURE GROUP A
Group A GRPA ON
OFFICE LIGHTING
Associate Loads
Associate Inputs
Modify Schedules
Modify Description
MODIFY SCHEDULES FOR
Group A OFFICE LIGHT
Use SEL to edit sch.
Days --ON-- --OFF-
(empty schedule)
ENTER SCHEDULE DETAIL
For GROUP A
DAYS: _______
Start time: 12:00 AM
End time: 12:00 PM
Clear Schedule
Press BACK when done


