


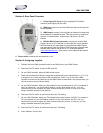


DMX PARTNER
9
Recording Shows (Cont.)
5. Adjust the steps hold time by pressing the “SPEED“ button. Next, use the “UP/DOWN“ buttons to
select the hold time ranging from 0.1 (one tenth of a second) to 10:00 (ten minutes).
6. Adjust the steps fade time by pressing the “FADE“ button. Next, use the “UP/DOWN“ buttons to
select the fade time ranging from 0.1 (one tenth of a second) to 10:00 (ten minutes).
7. To record the step, press “Record“. All eight chase LED’s will momentarily flash and the LCD will
display the next show step confirming that your step has been recorded.
8. Repeat steps 4-7 up to 99 times per show.
9. Press “BLACK-OUT“ twice to exit record mode.
Section 10: Editing Shows
10a. Adding steps to an existing show
1. Press and hold down the “Record“ button and simultaneously press chase buttons 1, 6, 8,1, 6, 8 in
sequence. As a result, the Record LED will illuminate. (Note: if you do not have a DMX controller
connected to the DMX input of the DMX Partner as described in the previous step, you will not
be able to access the Record mode).
2. Select the show you want to edit by pressing show button 1 or 2. The show LED will continually
flash and the LCD will display the total amount of show steps included into the selected show-
“SH:xx“.
3. To view the previously recorded steps, press the same show button, both show and record LED’s
will be lit. Use the “UP/DOWN“ buttons to scroll to the step you would like to add a new step after.
Once you find the step, press the same show button again so that the show LED is flashing. (You
must exit preview mode before you can record or add the new step).
4. From your DMX controller, select the scene to be added or manully adjust the channels to your
desired setting.
5. Adjust the steps hold time by pressing the “SPEED“ button. Next, use the “UP/DOWN“ buttons to
select the hold time ranging from 0.1 (one tenth of a second) to 10:00 (ten minutes).
6. Adjust the steps fade time by pressing the “FADE“ button. Next, use the “UP/DOWN“ buttons to
select the fade time ranging from 0.1 (one tenth of a second) to 10:00 (ten minutes).
7. To record the new step, press “Record“. All eight chase LED’s will momentarily flash and the LCD
will display the new show step confirming that your step has been recorded.
8. Repeat steps 3 -5 to add additional show steps.
9. Press “BLACK-OUT“ twice to exit record mode.