


10
• Making the connection to the Positive terminal may cause a spark as
a result of current flowing to charge capacitors within the inverter.
This is a normal occurrence.
• Because of the possibility of sparking, however, it is extremely
important that both the inverter and the 12 volt battery be positioned
far from any possible source of flammable fumes or gases. Failure to
heed this warning could result in fire or explosion.
• Operating the inverter without correctly grounding the unit may result
in electrical shock.
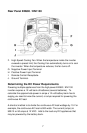
Mounting the Inverter
Your Energizer
®
Inverter should not be mounted under the hood of a
vehicle.
If installing in a vehicle, choose a dry, cool, ventilated area closest to the
battery as practical. Before drilling any mounting holes, make sure that
there are no wires, fuel lines, or tanks directly behind the surface to be
drilled. To mount the inverter:
1. Inverter must be OFF.
2. The inverter should be mounted horizontally.
3. Position the inverter against the mounting surface and mark
locations of the mounting screw openings.
4. Remove the inverter and drill four mounting holes.
5. Fasten the inverter to the mounting surface using corrosion-resistant
fasteners sized #10 or larger.
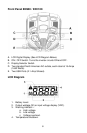
Connecting the Inverter
This inverter has two DC cable connections, one positive and one
negative. The order of steps in the following procedure minimizes the
danger of sparking near the battery bank.
1. Prepare all cable set ends with ring terminals at the battery ends.
2. Install one fuse holder with fuse in the Pos cable close to the battery
bank end.
3. Make sure the inverter is OFF.
4. Ensure all appliance cords or extension cords are disconnected from
the inverter.
5. Connect an appropriate stranded insulated wire to the enclosure
ground terminal and connect the free end of the wire to the vehicle’s