


Assigning an IP Address
Configuring and Monitoring the Switch 10-3
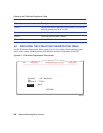
10.3 ASSIGNING AN IP ADDRESS
To assign an IP address to the switch, proceed as follows:
1. Select Management Setup Menu from the Main menu.
2. Select Network Configuration and then IP Configuration.
3. Highlight the IP address field and enter the IP address. Press ENTER.
The IP address is now set. The subnet mask is automatically set to correspond to the class of the
address entered. If a different mask is used on the network, highlight Subnet Mask and enter the
appropriate mask.
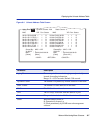
10.4 CHECKING NETWORK CONFIGURATION STATUS
To check connection status for the network, proceed as follows:
1. Select Device Control Menu from the Main Menu.
2. Select Port Information and press ENTER.
3. If a network cable is properly connected to a port, the Link for the port reads UP. If no cable is
connected to the port, or if the cable or port is faulty, the Link for the port reads DOWN.
4. If you see a DOWN status for a connected port, plug the cable into another port on the switch or
try another cable.
10.5 CONNECTING VIA TELNET
You can connect to the switch from a remote location using the Telnet application. This application
allows you to establish in-band access to the console menus.
To connect to the switch via Telnet, proceed as follows:
1. Assign an IP address using the Network Configuration Menu.
2. Set a password using the Console Login Configuration Menu.
3. Login to the switch via Telnet using the configured IP address and the password.
10.6 SETTING SNMP MANAGEMENT ACCESS
Access to the switch through SNMP is controlled by community names. The community names set
for the switch must match those used by the SNMP management station for successful
communication to occur. Access for community names can be set to READ/WRITE or READ
ONLY access. The default “Public” community name allows READ ONLY access to the device
via SNMP, whereas the default “Private” community name allows READ/WRITE access.