


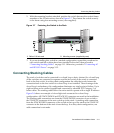


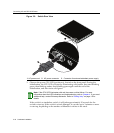


Connecting AC and RPS-SYS Power
SecureStack A2 Installation Guide 3-15
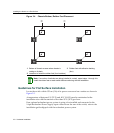
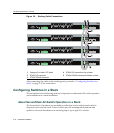
Adding a New Switch to an Existing Stack
Usethefollowingproceduretoinstallanewswitchtoanexistingstackconfiguration.
Thisprocedureassumesthatthenewswitchbeingaddedhasacleanconfigurationfrom
manufacturingandisrunningthesamefirmwareimageversionasotherswitchesinthe
stack.
1. Ensurethatpowerisoffonthenewswitchbeinginstalled.
2. Useoneofthefollowingmethodstocompletethestackcableconnections:
–Iftherunningstackusesadaisychaintopology,makethestackcableconnections
fromthebottomofthestacktothenewswitch(thatis,STACKDOWNport
from
thebottomswitchoftherunningstacktotheSTACKUPportonthenewswitch).
–Iftherunningstackusesaclosedloopconfiguration,breaktheloopandmakethe
stackcableconnectionstothenewswitchtoclosetheloop.
3. Applypowertothenewswitch.
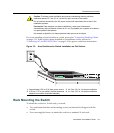
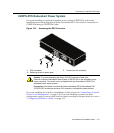
Connecting AC and RPS-SYS Power
AC Power
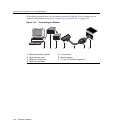
ToconnectaswitchtotheACpowersource,refertoFigure3‐9andproceedasfollows:
1. Plugthepowercord intotheswitchACpowerconnector.
2. PlugtheotherendofthepowercordintoadedicatedgroundedACoutlet(not
shown).Thetypeofpoweroutletandpowercordarecountry‐dependent.
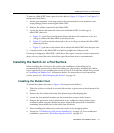
Important Considerations About Using Clear Config in a Stack
When using the clear config command (as described in the SecureStack A2 Configuration Guide)
to clear configuration parameters in a stack, it is important to remember the following:
• Use clear config to clear config parameters without clearing stack switch IDs. This command
WILL NOT clear stack parameters and avoids the process of re-numbering the stack.
• Use clear config all when it is necessary to clear all config parameters, including stack switch
IDs and switch priority values.
Note: The power supply in the switch has automatic voltage sensing that allows
connection to power sources ranging from 100–120 Vac, 2.5 A or 200–240 Vac, 1.25 A,
50/60 Hz.
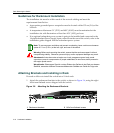
Note: If you plan to connect all the switches quickly to allow automatic Manager selection,
wait until all switches are fully operational before proceeding to the next step.
If you plan to power up each switch and allow it to become fully operational before
applying power to the next switch, proceed to the next step.