


ActionPrinter 2250
l The printer does not feed paper back to the paper-park position
and then advance it to the top-of-form position between jobs
even if paper is loaded when you turn on the printer.
In addition to changing the back-feed setting, also follow the
instructions below when you print on labels:
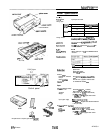
l Always use labels designed for use with a tractor. Do not try to
print on single-sheet labels.
l Because labels are especially sensitive to extremes of
temperature and humidity, use them under normal operating
conditions only.
l Make sure that your printing stays entirely within the printable
area of the labels because printing on the edge of a label or on
the backing sheet can damage the printer.
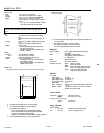
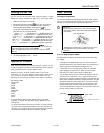
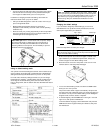
Note: When you
want to remove labels from the printer, always
tear off the fresh supply of labels at the rear of the printer as
shown below and then press the LF/FF button to advance the
remaining labels out of the printer. This is necessary to prevent
the labels from being fed backward.
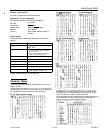
Using the default-setting mode
Your printer has internal settings that control such functions as top
of-form position and page length. These settings are called default
settings because they take effect each time you turn on the printer.
For most users, the factory settings are best, but you can change
these settings if necessary. The table below lists all the features you
can change in the default-setting mode; the next section tells you
how to change them; and the section after that describes each feature
in detail.
----
Note:
Most software programs control the printer features listed
here. If you can use your software program to control the printer,
you may never need to use the default-setting mode. In fact, you
may find that your program settings override your printer’s
default settings. See your software documentation for more
information.
Changing the default settings
If you do need to change any default settings, you can do as
described below. You press the control panel buttons, and the
control panel lights show your selections.
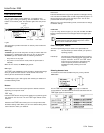
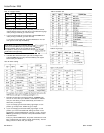
Light 1 Light 2
READY light
.
j
FONT button LF/FF button
Follow the steps below to make your changes.
Note: You can repeat steps 6 through 8 if you want to make more
than one change. Also, you can turn off the printer and start over
if you are not sure about a setting.
Make sure the printer is turned off and paper is loaded in the
paper cassette. If you installed the push tractor, always use
continuous paper for the default-setting mode.
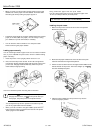
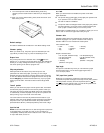
2.
Slide the narrow cover off of the printer cover as shown. This
makes it easier to read the printed messages.
3.
To enter the default-setting mode, hold down the FONT button
while you turn on the printer.
The printer loads a sheet of paper automatically and prints the
first instruction and a table that shows you which languages you
can choose. You can print the default-setting mode messages in
English, French, German, Italian, or Spanish.
4.
To choose English, press the FONT button until light 1 is off and
light 2 is on; then press the LF/FF button.
To choose another language, use the table below and press the
FONT button until the lights indicate your selection; then press
the
LF/FF
button.
9-Pin Printers 7/14/92
AP-2250-9