


EPSON Stylus Photo 820
10 -
EPSON Stylus Photo 820 9/01
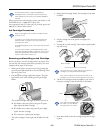
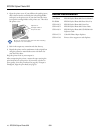
4. Open the printer cover. If you still have the packing insert,
slide it down into the area beside the ink cartridge holder
and tape it to the printer case. If you don’t have the insert,
just tape the cartridge holder to the printer case. Then close
the printer cover.
Be sure to remove the tape and insert after installing
the printer in its new location.
5. Push in the output tray extension and close the tray.
6. Repack the printer and its attachments in the original box
using the protective materials that came with them. See
your Start Here sheet.
Keep the printer level as you transport it.
After transporting the printer, remove the tape securing the
print head and test your printer. If you notice a decline in
print quality, clean the print head (see page 8); if output is
misaligned, align the print head (see page 8).
Related Documentation
TM-SP820 EPSON Stylus Photo 820 Service Manual
PL-SP820 EPSON Stylus Photo 820 Parts Price List
CPD-12673 EPSON Stylus Photo 820 Start Here
CPD-12672 EPSON Stylus Photo 820 Printer Basics
CPD-12674 EPSON Stylus Photo 820 CD-ROM with
Reference Guide
CPD-12772 ColorLife Photo Paper slipsheet
CPD-12749 Printer driver support on web slipsheet
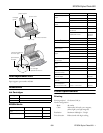
Tape the ink
cartridge holder to
the printer case