


EPSON Stylus Photo 875DC
7 -
EPSON Stylus Photo 875DC
4/00
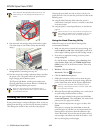
4. Hold down the
E load/eject button, then press and release
the
Ppower button. Continue holding down the
E load/eject button until the
Ppower light starts to flash,
then release it.
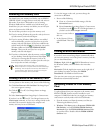
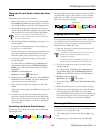
The printer prints one page showing its ROM version
number, ink counter, and a nozzle check pattern. Only the
nozzle check pattern is shown below. (If the pattern has
gaps in its dots, you need to clean the print head; see
page 11.)
5. To end the check, turn off the printer after it prints the
check page. Then reconnect the interface cable and turn on
your printer and computer.
If the check page prints, the problem probably lies in your
software settings, the interface cable, or your computer.
If the check page doesn’t print, you may have a problem with
your printer.
Try the suggestions in “Problems and Solutions” in the Printer
Basics book.
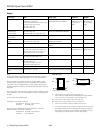
Printing on Special Media
Whether you print on plain paper or special media, you need
to select the Media Type setting according to the guidelines in
the table below.
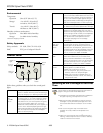
Additional Media Loading Guidelines
Don’t use the cleaning sheets that may be included with
your special media; they may damage the printer.
❏ Be sure to load the printable (whiter) side of the media face
up in the sheet feeder.
❏ You can load paper up to the arrow mark on the left edge
guide.
❏ In addition to the
Media Type option, remember to select
the correct
Paper Size for your media in the printer
software.
❏ If the special media has protective sheets between each sheet
of media, be sure to remove the protective sheets before
printing.
❏ Some special media have a cut corner that you need to
position correctly; follow any instructions in the package.
Always handle sheets by the edges, and don’t touch the
printable surface.
❏ If you’re printing on roll paper, never select
Auto Sheet
Feeder
as the Paper Source setting; unnecessary amounts of
paper will feed into the printer.
❏ With roll paper, don’t use the printer software’s
Reverse
Order
or Rotate by 180° settings, or select Maximum or
Centered as the Printable Area setting, or use any settings
on the Layout dialog box. They won’t work with roll paper.
❏ Make sure the edge of the roll paper is cut cleanly—at a 90°
angle in each corner—to ensure proper loading.
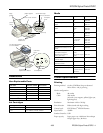
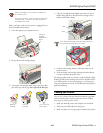
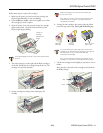
Inserting the Memory Card
1. Locate the memory card adapter that came with your
printer.
2. Slide your memory
card, connector end
first, into the card
adapter. Push gently
until the card is firmly
seated.
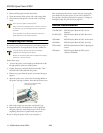
3. Insert the card adapter,
connector end first,
into the printer’s
memory card slot. Push
gently until the adapter
is firmly seated.
For this paper name...
Select this Media Type
setting
Plain paper and envelopes Plain paper
EPSON 360 dpi Ink Jet Paper
EPSON Iron-On Cool Peel Transfer Paper
360 dpi Ink Jet Paper
EPSON High Quality Ink Jet Paper
EPSON Photo Quality Ink Jet Paper
EPSON Photo Quality Ink Jet Cards
EPSON Photo Quality Self-Adhesive Sheets
Photo Quality Ink Jet Paper
EPSON Photo Paper Photo Paper
EPSON Premium Glossy Photo Paper Premium Glossy Photo
Paper
EPSON Photo Quality Glossy Film
EPSON Photo Stickers
Photo Quality Glossy Film
EPSON Ink Jet Transparencies Ink Jet Transparencies
Matte Paper - Heavyweight Matte Paper - Heavyweight