


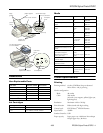


EPSON Stylus Photo 875DC
9 -
EPSON Stylus Photo 875DC
4/00
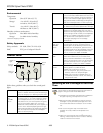
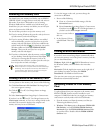
You see a screen similar to the following:
3. Click
OK to enable write-to-disk mode, then insert the
memory card in the memory card slot.
4. Locate the photos you want to upload on your hard drive. If
you have an EPSON camera, drag them to the
Dcim folder
on your memory card.
If your digital camera is not made by EPSON, your photos
may be saved to a different folder on your card. To find
the correct folder, locate the drive assigned to the
memory card (Windows applies the label Removable
Disk, and Macintosh calls the drive Unknown or Untitled).
Double-click the drive to open it. The first folder you see
is your photo folder.
You must copy or move your photos to the correct folder
on your memory card. Otherwise, you won’t be able to
view them using the View PC Card Images button or
View Images command in Image Expert.
5. To return to read-only mode, eject the memory card from
the memory card slot (see “Removing the Memory Card”
on page 8).
6. Windows: Click
Start and point to Programs, EPSON
USB RW Switcher
, and select RW Switcher.
Macintosh: Open the
EPSON USB RW Switcher folder
on your hard drive and double-click the
EPSON USB RW
Switcher
icon.
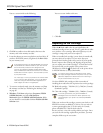
You see a screen similar to this one:
7. Click
OK.
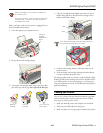
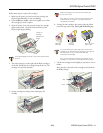
Replacing an Ink Cartridge
When the
B black or
A color ink out light flashes, the
indicated cartridge is low on ink. This is a good time to make
sure you have a new cartridge. When the light stays on, the
cartridge is empty and you need to replace it.
When an installed ink cartridge is more than six months old,
you may also need to replace it if you notice that your
printouts don’t look as good as they used to. If print quality
doesn’t improve after cleaning and aligning the print head,
you can replace one or both cartridges. To check the level of
ink you have left, see the graphic in the printer driver
(Windows) or click the ink level icon in the printer driver
or EPSON Monitor 3 utility (Macintosh).
You cannot print if either ink cartridge is empty. Leave
the empty cartridge installed in the printer until you have
obtained a replacement. Otherwise the ink remaining in
the print head nozzles may dry out.
Use these EPSON ink cartridges within six months of
installing them and before the expiration date on the package:
❏ Black ink cartridge: T007201 (U.S.); T007311 (Canada)
(Standard Capacity)
❏ Color ink cartridge: T008201 (U.S.); T008311 (Canada)
To ensure good results, use genuine EPSON ink
cartridges and do not refill them. Other products may
cause damage to your printer not covered by EPSON’s
warranty.
When you need new ink cartridges, contact your dealer or call
EPSON Accessories at (800) 873-7766 or visit our web site
at www.epsonsupplies.com (U.S. sales only). In Canada,
please call (800) 873-7766 for dealer referral.
Be sure you have a new ink cartridge before you begin. Once
you start the ink cartridge replacement procedure, you must
complete all the steps in one session.