


EPSON Stylus Photo 875DC
4/00 EPSON Stylus Photo 875DC
- 8
Removing the Memory Card
You should eject your memory card before you use EPSON
USB RW Switcher to toggle between read-only and write-to-
disk mode. If you have a Macintosh or you’re running
Windows 2000 and have enabled write-to-disk mode, you
should also eject your memory card before you turn off your
printer or disconnect the USB cable.
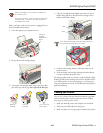
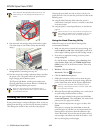
Use one of these procedures to eject the memory card:
❏ If you’re running Windows 98, press the card eject lever to
eject the memory card and card adapter.
❏ If you’re running Windows 2000 and have not enabled
write-to-disk mode, press the card eject lever to eject the
memory card and card adapter. If you have enabled write-
to-disk mode, left-click the Eject Hardware icon on the
Windows taskbar and click
Stop EPSON SP 875DC
Storage
. Then press the card eject lever to eject the
memory card and card adapter.
❏ If you have a Macintosh, select the memory card icon
on your desktop. From the Special menu, select
Eject. Wait
until you see a message that the memory card can be
removed from the card drive, and then press the card eject
lever to eject the card and card adapter.
Never remove the memory card or turn off power to
either the printer or computer while the card access light
is flashing. The computer and memory card reader are
communicating, and removing the card or turning off
power could corrupt memory card data.
Viewing Photos on the Memory Card
To view photos on the memory card, do one of the following:
❏ Click
View Pictures in PC Card Slot if the Image Expert
™
view screen appears at startup.
❏ Click the View PC Card Images button on Image
Expert’s toolbar.
❏ Select
View Images from Image Expert’s Camera menu.
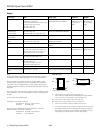
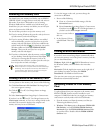
If you don’t see the View PC Card Images button or the
View Images command, or if you see a message similar to the
one below, the connection between the computer and
memory card may be set to USB/Serial.
To view the images on the card, you must change the
connection to
PC Card.
1. Do one of the following:
❏ If you see a Connection Failed message, click the
Connection button.
❏ Select
Connection from Image Expert’s Camera menu
if you don’t see the View PC Card Images button, or
you don’t see the
View Images command.
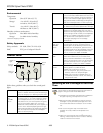
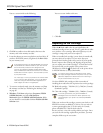
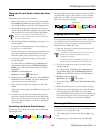
You see a screen similar to
this one:
2. In the Connect Via box,
select
PC Card. Then click
OK.
Closing EPSON PhotoStarter
If you don’t want to start Image Expert automatically when
you insert the memory card in the printer’s memory card slot,
you can close PhotoStarter.
Windows: Right-click the EPSON PhotoStarter icon on
the Windows taskbar, and click
End on the menu that
appears.
Macintosh: Click the Application menu on the right side of
your desktop’s menubar, and then click
EPSON
PhotoStarter
. Click Quit on the File menu.
The next time your restart your computer, EPSON
PhotoStarter automatically launches.
Uploading Photos to Your Memory
Card
To upload photos from your computer to the memory card,
EPSON USB RW Switcher must be installed on your
computer. USB RW Switcher lets you toggle your memory
card between read-only mode and write-to-disk mode.
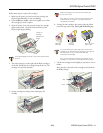
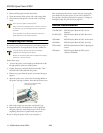
1. Eject the memory card from the memory card slot (see
“Removing the Memory Card”).
2. Windows: Click
Start, point to Programs, EPSON USB
RW Switcher
, and select EPSON USB RW Switcher.
Macintosh: Open the
EPSON USB RW Switcher folder
on your hard drive. Double-click the
EPSON USB RW
Switcher
icon.