


3. Hold down the Load/Eject button as the printer is turned back on. This prints a
demonstration page in order to check the result.
4. Turn off the printer to exit demonstration mode.
If the cleaning operation is performed more than 4 times continuously, ink is not absorbed because
of dummy CL sequence function. Threfore, if cleaning operation is required more than 4 times, it
should be restarted after printing something out once, such as self-test or demonstration page.
6.1.2 Waste Ink Drain Tank Replacement
The printer counts the total amount of ink drained to the waste ink tank, and this information is stored in the
EEPROM on the main board (Protect counter A) for ink system operation management. If the value of this
counter reaches a predetermined value, all three lights blink and indicate error status. (“Maintenance request,”
see Chapter 1, Error indications, Table 1-15). When this error is displayed, replace the waste ink drain pad
and reset the protect counter.
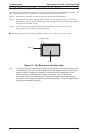
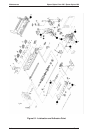
1. Remove the printer mechanism (Refer to3.2.5) and replace the waste ink tank located in the waste ink
tank.
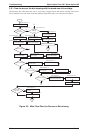
2. After reassemble the printer, take following steps in order to reset the protect counter.
3. ➮ Turn the printer on while holding down the Clening and Load/Eject buttons.
➬ Within 3 seconds after ➮ prcedure, hold down Load/Eject button for 10 seconds.(until Ink out and
Paper out lights start blinking)
4. Under this condition, press the Cleaning button, then initialize operation will be automatically
perforemed.
❐Since the value of conater is stored in EEPROM, the waste ink pad must be replaced when the
main board is replaced. Ohterwise, ink might leak from the waste ink tank while printing.
CAUTION
CAUTION
Maintenance Epson Stylus Color 200 / Epson Stylus 200
6-2 Rev. A