


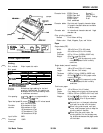


EPSON LQ-300
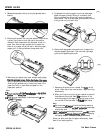
Switching back to single sheets
To switch to single sheets, press
the Font
and
LF/FF
buttons
’
at the same time; the printer feeds the paper backward into
the paper-park position.
ca
Caution:
Always tear off paper before back-feeding; back-feeding too
many sheets can cause a paper jam.
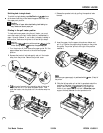
Printing in the pull tractor position
To load continuous paper using the pull tractor, you must
move the tractor to the pull tractor position; as described in
steps 1 through 3 below. If your tractor is already installed in
this position, make sure the printer is off and skip to step 5.
a
caution:
When using
the
pull
tractor, set the
auto tear
offfeature
in the
Printer Setting mode to
8;
otherwise the paper may jam.
1.
Turn the printer off; then remove the paper guide. Pull the
paper-release lever forward to the continuous paper
position.
2.
Squeeze the tractor’s lock tabs gently and pull the tractor
away from the printer. Remove the printer cover.
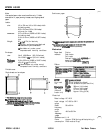
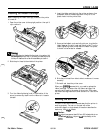
3.
Lift the tractor forward to the mounting slot at the top of
the printer and tilt it into place as shown below. Then
push the tractor onto the posts until the notches snap into
place.
Y---.
_-
.
Dot Matrix Printers
4.
Release the sprocket units by pulling the sprocket locks
forward.
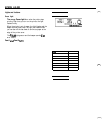
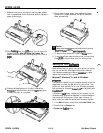
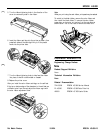
5.
Insert the paper into the paper slot as shown below and
pull it up. Position the paper using the scale on the printer
as a guide. The printer prints to the right of the position
marked 0.
Note:
Make sure your paper supply is positioned within
I
meter (3 feet) of
the printer.
6.
Slide the left sprocket unit so that its sprockets match the
position of the holes in the paper and lock the unit in
place. Then slide the
ri&t
sprocket unit to match the
width of your paper, but do not lock it.
Move the
paper
support midway between the two sprocket units.
10/2/94
EPSON LQ-300-11