


49
Appendix
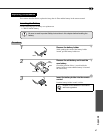
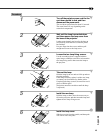
Procedure
1
Turn off the projector power, wait for the
cool-down period to end, and then
disconnect the power cord.
The cool-down period lasts for about 25 seconds.
The actual time will vary depending on the
external air temperature.
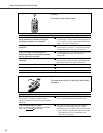
2
Wait until the lamp has cooled down,
and then remove the lamp cover from
the base of the projector.
It takes approximately one hour for the lamp to
cool down by itself after the cool-down period
has finished.
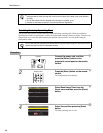
Put your finger into the recess, and then pull
straight out to remove the lamp cover.
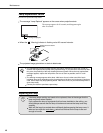
3
Loosen the two lamp fixing screws.
Use the screwdriver that is supplied with the
spare lamp or a Phillips screwdriver to loosen the
two lamp fixing screws that secure the lamp to
the projector.
4
Take out the lamp.
Hold the lamp by the two tabs to lift it up and out
from the projector.
If the lamp is broken, replace it with a new lamp,
or contact your local dealer for further advice.
If replacing the lamp yourself, be careful to avoid
pieces of broken glass.
(Projection cannot be carried out until the lamp
is replaced.)
5
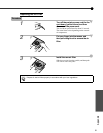
Install the new lamp.
Hold the lamp so that it faces the correct way to
fit into the projector, and then insert the lamp and
tighten the two lamp fixing screws.
6
Install the lamp cover.
Slide the cover in from the outside, and then push
it in until it clicks into place.