33
■ Try reconnecting both ends of your cable.
■ Make sure your video equipment is on. If it isn’t, turn the projector off, then turn it on
again after you’ve turned on your video equipment.
You see a screen with the message
No Signal displayed.
■ Make sure your video equipment is turned on.
■ Make sure your cable(s) are connected correctly, as described in the Quick Setup sheet.
■ Press the Source button on the projector or the Input A/B or S-Video/Video buttons on
the remote control to select the correct input source. Allow a few seconds for the
projector to sync up.
■ Check the settings in the Video Signal and Input A options in the Setting menu to
make sure they’re correct for your video equipment. See page 22 for details.
If you’re using a PC laptop:
■ Press the function key that lets you display on an external monitor. It’s often labeled with
an icon such as , but it may also be labeled
CRT/LCD. You may have to hold down
the
Fn key while pressing it. Check your laptop’s manual or online help.
On most systems, the key lets you toggle between the LCD screen and the
projector, or display on both at the same time. Allow a few seconds for the projector to
sync up after pressing it.
■ Depending on your computer’s video card, you might need to use the Display utility in
the Control Panel to make sure that both the LCD screen and external monitor port are
enabled. See your computer’s documentation for details.
If you’re using a Macintosh laptop with OS X:
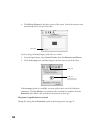
1. Select
System Preferences from the Apple menu and click Displays.
2. Click
Detect Displays.
3. To display the entire desktop on both your projector screen and LCD screen, click
the
Arrange tab. (If you don’t see this tab, make sure it isn’t hidden by another
window.)


