


INSTALLATIONINSTALLATION
- 3 -
INSTALLATION
Before you begin the installation procedure, check and verify content of the ThinCom package. If you are missing any of the items listed below, please contact your dealer.
! ThinCom PC Card
! Device driver and Diagnostics diskette
! This User's Manual
! Diskette and manual for data and fax communications software
! Telephone line interface cable with RJ-11 modular plug
! Ethernet 10 Base T interface cable with RJ-45 modular plug for network opration
Before You Begin
CAUTION! The electronic components and IC chips installed on the ThinCom card are very sensitive to damage from static electricity. Before touching the card, touch a grounded
metal surface.
- Inspect the ThinCom card for any damage which may have occurred during shipping. If any damage is found, please notify your dealer immediately for prompt replacement.
- Turn off the computer
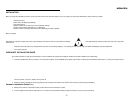
HARDWARE INSTALLATION GUIDE
This section provides you with general information on how to install the PC Card into the majority of notebook computers available on the market today.
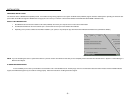
1. Locate the PCMCIA slot, which is usually on one side of the computer. Some PCMCIA system allows "hot insertion" (inserting the card while PC power still on). Consult your computer User's
manual for detail. If you are in doubt, turn the power off.
2. Align the ThinCom card with the arrow sign pointing to the computer's slot. (Please note that the card is keyed to guide for proper installation.)
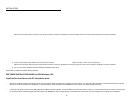
Hardware Installation Guide (Cont.)
3. Slowly insert card into a slot and press firmly until the ThinCom card connector is seated.
4. Insert the telephone line interface cable with RJ-11 connector into the Fax/Data modem port (Black connector). Push in the connector firmly.