


Cable Cubby 300/600/800 • Installation 10
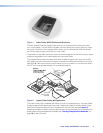
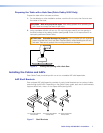
Installing the AAPs
The split AAPs can be replaced with passive Extron AAPs.
Replace a set of split AAPs as follows:
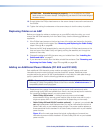
1. Remove the set of split AAPs to be replaced by unscrewing the nuts on the underside
of the shelf bracket that fasten the plates to the bracket (see figure 7, on page 7).
2. Cable the AAP(s) before attaching the AAPs to the enclosure.
3. Insert the screws of the AAPs through the holes in the shelf or shelf bracket. Secure the
AAPs to the shelf brackets with the provided captive washers and #4-40 nuts.
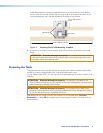
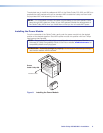
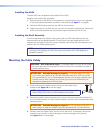
Installing the Shelf Assembly
From the underside of the Cable Cubby, gently push the AAP shelf assembly into the
desired position at the desired elevation. Ensure there is enough space above the AAP
assembly for the Cable Cubby lid to close completely. Secure the AAP shelf assembly into
position with four Phillips head screws.
NOTE: If the AAP shelf assembly does not slide easily into the cubby, loosen the AAP
mounting nuts. Retighten the AAP mounting nuts once the AAP shelf assembly is
installed in position.
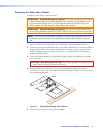
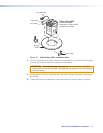
Mounting the Cable Cubby
CAUTION: Risk of personal injury. The flanged edges of the top of the surface
enclosure are sharp. Exercise caution when the cubby is not installed in a table to
prevent personal injury.
ATTENTION: Potential damage to property. The flanged edges of the top
of the cubby are bevelled to an ultra-fine thickness of less than 0.04 inch (4/100
inch; approximately 1 mm). These edges are soft and can be easily nicked or bent.
Exercise caution when handling and mounting the enclosure. Mishandling can
damage the appearance of the enclosure.
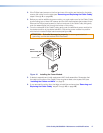
1. If screw clamps are installed, remove them from both sides of the
enclosure (see figure 10 on the next page).
NOTE: Figure 10 shows the installation of a Cable Cubby 300C.
Cable Cubby 300S, 600, and 800 installations are similar.
2. Remove the plastic strips that protect the corners of the enclosure and the plastic film
on the finished surfaces. If a sticky residue remains, remove it with an appropriate metal
cleaning product.
ATTENTION: Potential damage to property. Do not use isopropyl alcohol or
other solvents to clean the Cable Cubby. Strong solvents will ruin some finishes.
3. Carefully lower the Cable Cubby into the hole to test the fit. If necessary, remove the
enclosure and use a file or rasp to enlarge or smooth the edges of the opening
(see figure 10 on the next page).