


Audio/Video Switchers • Operation
Audio/Video Switchers • Operation
Operation, cont’d
3-6
1. There is one audio level setting per input. The
setting is shared by the left and right audio inputs.
2. The audio level settings are stored in non-volatile
memory. When power is removed and restored, the audio
level settings are retained.
Viewing and adjusting an audio level
See figure 3-3 and figure 3-4 and the following steps for an
example of viewing and adjusting the audio level on a switcher
with audio.
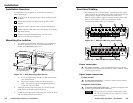
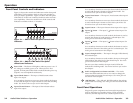
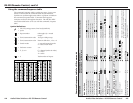
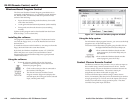
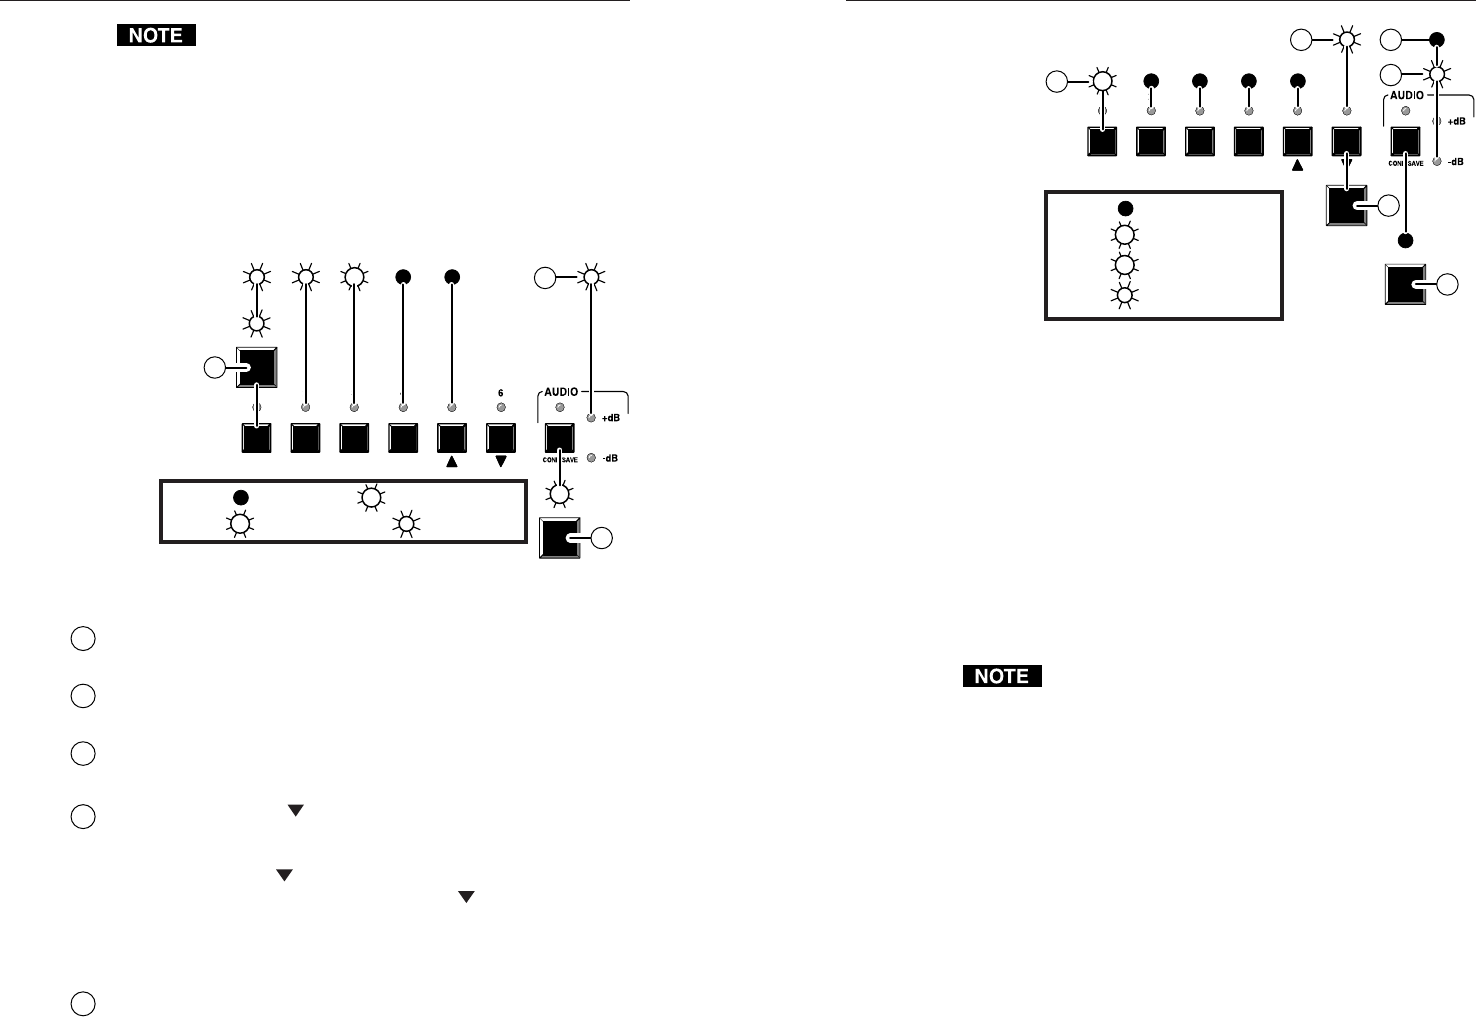
LED key: = off (value 0 dB), = slow blink (value 1dB),
= fast blink (value 2dB), = on (value 3dB)
B1
B2
A
B2
B
CONF./SAVE
B2
C
+8dB
Figure 3-3 — Viewing the audio level
A
Press and release an input button to select an input. The
associated input LED lights.
B
Press and hold the Audio Conf./Save button until the Audio
LED starts blinking.
C
The gain or attenuation value is displayed in the input 1
through 5 LEDs. In Figure 3-3, the value +8dB is displayed.
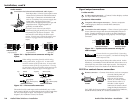
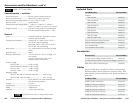
D
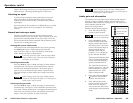
Press and release the button several times to decrease the
audio level displayed in the input LEDs by 1dB per button
push. Note the input LED, +dB LED, and -dB LED changes that
occur each time the button is pressed and released.
Figure 3-4 shows the result of pressing the button a total of
nine times to change the value to -1dB. Note that the +dB LED
has turned off and that the -dB LED is on to indicate a negative
level.
E
Press and hold the Audio Conf./Save button until the Audio
LED off. The input LEDs stop displaying the audio level, the
+dB and -dB LEDs go off, and the selected input LED lights.
LED key: = off (value 0 dB),
= fast blink (value 2dB),
B1
B2
= slow blink (value 1dB),
= on (value 3dB)
D
CONF./SAVE
B1
E
CONF./SAVE
D
D
E E
-1dB
Figure 3-4 — Adjusting the audio level
Audio level reset
To reset the audio level to 0dB for all inputs, press and hold the
Audio Conf./Save button for approximately 10 seconds. The
Audio LED begins to blink and then turns off. Release the
Audio Conf./Save button.
Memory
Audio and switch mode settings are saved in nonvolatile
memory. When the switcher is powered off, the settings are
retained. When the switcher is powered on, the saved memory
settings are active. The selected input is not a saved value;
when the switcher is powered on it defaults to input 1.
If an auto-sync detect model switcher is powered off in
auto mode, it automatically switches to the highest-
numbered input with video sync pulses present when it
is powered back on. If no input has video present, all
input select LEDs are off (only the Power LED is on).
Troubleshooting — If no image appears
1. Ensure that all devices are plugged in and powered on.
The switcher is receiving power if the front panel Power
LED is lit.
2. Ensure an active input is selected on the switcher or that
the switcher is in auto-sync mode.
3. Ensure that the proper signal format is supplied.
4. Check the cabling and make corrections as necessary.
5. Call the Extron S
3
Sales & Technical Support Hotline if
necessary.
3-7