


15
Fig. 26a
Fig. 26b
9 ON SCREEN MENU
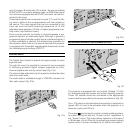
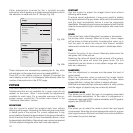
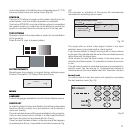
After selecting the source signal (by means of the and
keys), press MENU+/MENU - to confirm and close the pull-
down menu; the value you have just set will be displayed on
the right of the < symbol.
As with the other inputs, you can now select the input just set
by pressing the key.
During the short time it takes to find the signal, a box appears
showing the signal requested. As soon as the signal is shown
SOURCE SELECTION
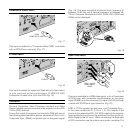
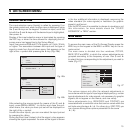
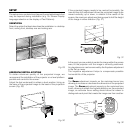
The input selection menu (Inputs) is called by pressing 0 on
the remote control and, when no other menu is displayed, using
the and keys on the keypad. To select an input, scroll the
list with the and keys until the desired input is highlighted,
then press .
Display of the input selection menu is terminated by pressing
the ESC key, or when the time allowed for displaying the on-
screen menu has lapsed (set in the Set-up Menu).
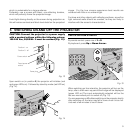
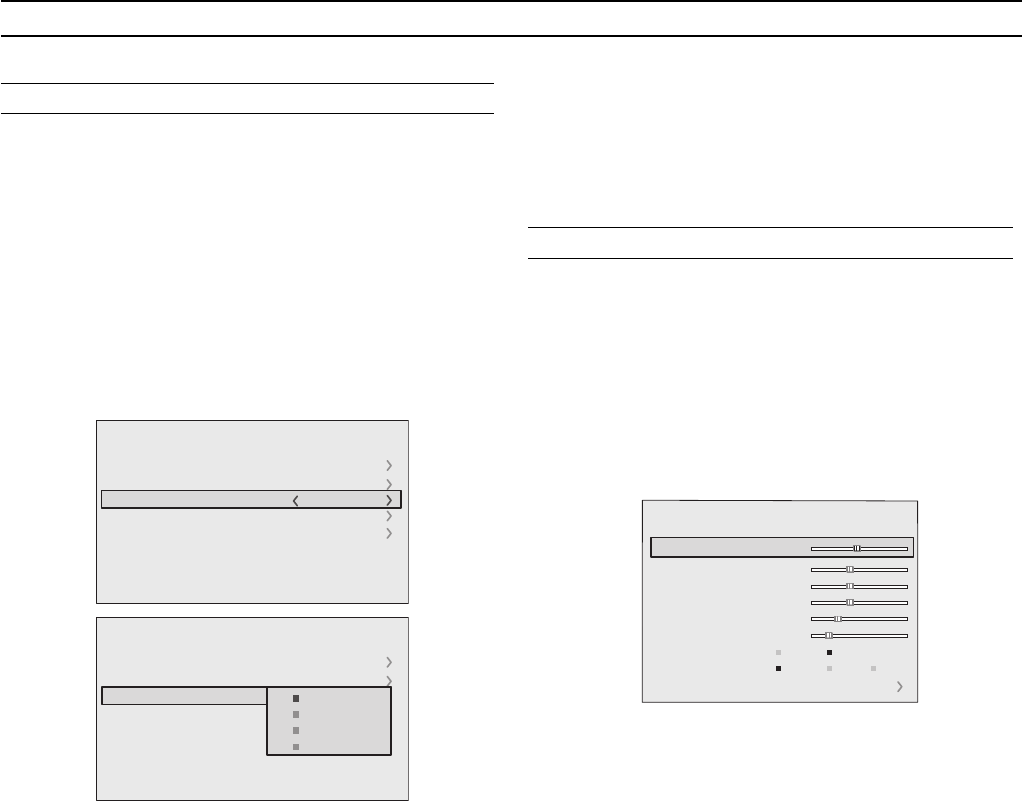
Input 3 can receive RGB and YCrCb signals, at 15 kHz, 32 kHz
or higher. The association between the input and the type of
signal is made from the pull-down menu that appears on the
right of the < symbol after pressing the key
(Fig. 26b)
.
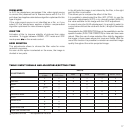
Inputs
1 VIDEO
2 S-VIDEO
3
COMPONENT/RGBS
4 GRAPHICS RGB
5 DIGITAL INPUT
1
2
3
4
5
15kHz
RGBS
Inputs
1 VIDEO
2 S-VIDEO
4 GRAPHICS RGB
5
1
2
3
4
5
15kHz
RGBS
RGBS 15kHz
RGBS
YCrCb 15kHz
YCrCb
3
COMPONENT/RGBS
DIGITAL INPUT
in the box additional information is displayed concerning the
video standard (for video signals) or resolution (for graphic
signals), and format.
Fom the
SETUP
menu it is possible to choose to visualize or not
this information, for more details check the “
SOURCE
INFORMATION
” in “
MENU
” section.
The various menus only offer the relevant adjustments in
accordance with the type of input signal displayed (e.g. certain
typical adjustments for video signals, not necessary for graphic
signals, do not appear on the menus, and vice versa).
Some adjustments (e.g.
BRIGHTNESS
and
CONTRAST
) are
associated with a numerical value that can be varied within the
set limits using the keys / . For others (e.g.
VIDEO TYPE
) you
can choose among three options presented on the same
/ ).
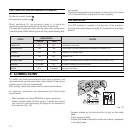
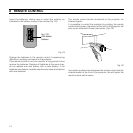
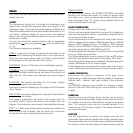
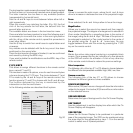
Fig. 27
MAIN MENU
To access the main menu of the On Screen Display press the
MENU
key on the keypad or the
MENU+
or
MENU-
key on the re-
mote control.
The main menu is divided into four windows,
PICTURE,
IMAGE, SETUP
and
MENU
, in which the various adjustments are
grouped according to the frequency of use. Use and
to select the line corresponding to the adjustment you wish to
make
(Fig. 27)
.
Picture
Contrast
Color
Tint
Sharpness
Filter
Cinema Mode
Video Type
50
50
50
3
2
Off
Normal
Auto
Auto
VCR1 VCR2
Noise Reduction
Brightness
60