50
Tr oubleshooting
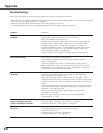
Before calling your dealer or service center for assistance, check the items below once again.
– Make sure you have properly connected the projector to peripheral equipment as described in "Connecting to a Computer"
and “Connecting to Video Equipment” on page15–17.
– Make sure all equipment is connected to AC outlet and the power is turned on.
– If the projector does not project an image being operated with a computer, restart the computer.
Appendix
Problem: – Solutions
No power – Plug the power cord of the projector into the AC outlet.
– See if the POWER indicator lights red.
–Wait 90-120 seconds after the projector is turned OFF when turning the
projector back on. The projector can be turned on after the POWER
indicator turns red. (See “Turning Off the Projector” on page 19.)
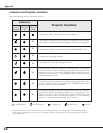
– Check the WARNING indicator. If the WARNING indicator lights red, the
projector cannot be turned on. (See "Warning Indicator" on page 45.)
– Check the projection lamp. (See page 48.)
– Unlock Key lock for the projector in the Setting Menu. (See page 42.)
Image is out of focus. – Adjust focus of the projector. (See page 22.)
– Provide proper distance between the projector and the projection
screen. (See page 13.)
– Check the projection lens to see if it needs cleaning. (See page 47.)
– Moving the projector from a cool to a warm place may result in moisture
condensation on the projection lens. In such cases, leave the projector
OFF and wait until condensation disappears.
No image – Check the connection between your computer or video equipment
and the projector. (See page 15–17)
– See if the input signal is correctly output from your computer. Some
laptop computers may need to change the setting for monitor output when
connecting to a projector. See your computer’s instruction manual for the
setting.
– It takes about 20 seconds to display an image after turning on the projector.
– See if the selected system is corresponding with your computer or video
equipment. (See page 25 and 34)
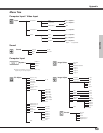
– Select correct input source once again through menu operation.
(See page 24, 32 and 33)
– Make sure the temperature is not out of the specified Operating
Temperature (5°C ~ 35°C).
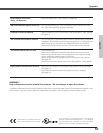
Image is Left/Right reversed. – Check the Ceiling / Rear item. (See “Setting” on page 41.)
image is Top/Bottom reversed. – Check the Ceiling item. (See “Setting” on page 41.)
No sound – Check audio cable connection from audio input source.
– Adjust the audio source.
– Press the Volume (+) button. (See page 23)
– Press the Mute button. (See page 23)


