


FortiGate-5001A Security System Guide
18 01-30000-83456-20081023
Removing a FortiGate-5001A board Hardware installation
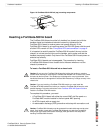
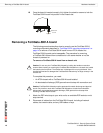
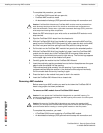
10 Once the board is inserted correctly, fully tighten the retention screws to lock the
FortiGate-5001A board into position in the chassis slot.
Removing a FortiGate-5001A board
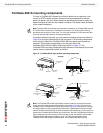
The following procedure describes how to correctly use the FortiGate-5001A
mounting components described in “FortiGate-5001A mounting components” on
page 14 to remove a FortiGate-5001A board from an ATCA chassis slot.
FortiGate-5001A boards are hot swappable. The procedure for removing
a FortiGate-5001A board from a chassis slot is the same whether or not the
chassis is powered on.
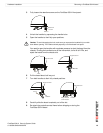
To remove a FortiGate-5001A board from a chassis slot
To complete this procedure, you need:
• An ATCA chassis with a FortiGate-5001A board installed
• An electrostatic discharge (ESD) preventive wrist strap with connection cord
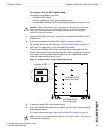
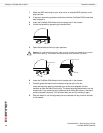
1 Attach the ESD wrist strap to your wrist and to an available ESD socket or wrist
strap terminal.
2 Disconnect all cables from the FortiGate-5001A board, including all network
cables, the console cable, and any USB cables or keys.
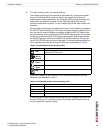
Tighten
Retention
Screw
!
Caution: Do not carry the FortiGate-5001A board by holding the handles or retention
screws. When inserting or removing the FortiGate-5001A board from a chassis slot, handle
the board by the front panel. The handles are not designed for carrying the board. If the
handles become bent or damaged the FortiGate-5001A board may not align correctly in the
chassis slot.
!
Caution: FortiGate-5001A boards must be protected from static discharge and physical
shock. Only handle or work with FortiGate-5001A boards at a static-free workstation.
Always wear a grounded electrostatic discharge (ESD) preventive wrist strap when
handling FortiGate-5001A boards.