


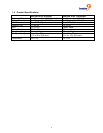
freeView Pro X10P User Manual
2 Installation
2.1 Configuring the Transmitter
Determine how far away the Transmitter will be located from the Receiver. If the distance is less
than 300 ft (91 m), set both DIP switches on the Transmitter to the OFF position. If the distance
is 300 ft (91 m) or more, set both DIP switches on the Transmitter to the ON position.
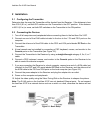
2.2 Connecting the Devices
1. Turn off all computers and peripherals before connecting them to the freeView Pro X10P.
2. Connect one end of the KVM cable included in the box to the VGA and PS/2 ports on the
computer.
3. Connect the other end of the KVM cable to the PS/2 and VGA ports labeled PC Port on the
Transmitter.
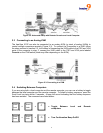
4. A local console can be installed by connecting a PS/2 keyboard, mouse, and monitor to the
Console ports on the Transmitter (see Figure 2-2).
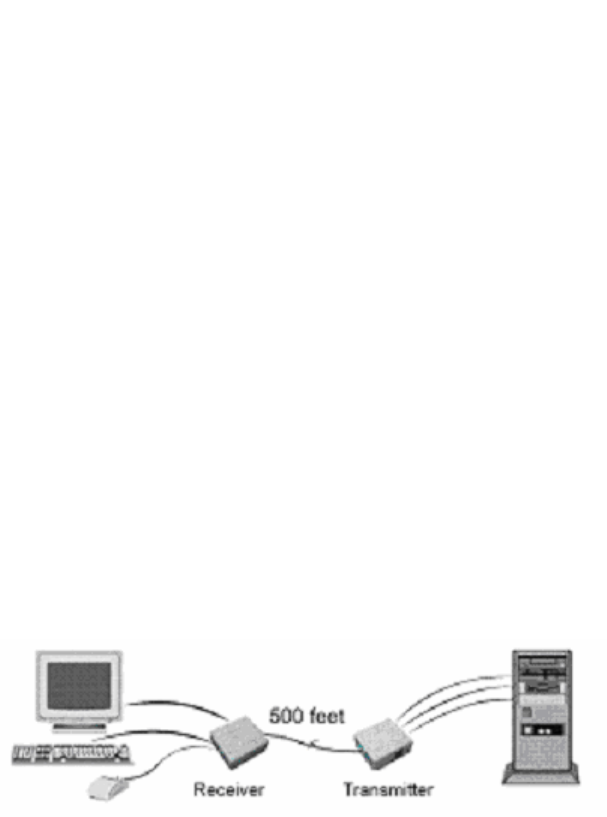
5. Connect the Transmitter to the Receiver by using a straight-through category 5, 5e, 6, or 7
cable.
6. Connect a PS/2 keyboard, mouse, and monitor to the Console ports on the Receiver to be
able to control the remote computer.
7. If you are connecting the Receiver to a local computer, connect one end of a KVM cable (not
included) to the PS/2 and VGA ports labeled PC Port on the Receiver, and the other end of
the KVM cable to the PS/2 and VGA ports on the local computer (see Figure 2-2).
8. Connect the power adapter to the Receiver and plug the adapter into an outlet.
9. Power on the computer and peripherals.
10. Adjust the video quality using the Video Tuning Dial on the Receiver to sharpen the picture.
Note: The RJ-45 ports on the freeView X10P are not standard Ethernet ports. Do not connect
the freeView X10P to a network device such as a switch or a hub, otherwise the device will not
work.
Figure 2-1: Basic Setup