2-1
2. INSTALLATION
Please unpack the Scanner carefully, and check the contents against the checklist. If any items
are missing or damaged, please contact your authorized local dealer immediately.
Precautions
• Keep the Scanner out of direct sunlight. Direct exposure to the sun or excessive heat may
cause damage to the unit.
• Do not install the Scanner in a humid or dusty place.
• Be sure to use the proper AC power source.
• Place the Scanner securely on an even, flat surface. Tilted or uneven surfaces may cause
mechanical or paper-feeding problems.
• Retain the Scanner box and packing materials for shipping purposes.
2.1 SHIPPING BRACKET
The Scanner has a bracket that locks the carrier mechanism for transportation purposes. This
bracket must be put into the use position before using the Scanner.
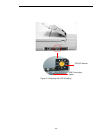
If the power is turned on before the bracket has been removed the PAPER JAM light will turn on.
Before proceeding, turn the power off, disconnect all cables and follow the instructions below to
remove the shipping bracket.
2.1.1 REMOVING THE SHIPPING BRACKET
i). Carefully place the Scanner in an upright position on its front.
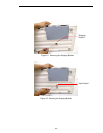
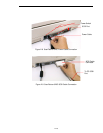
ii). Using a suitable screwdriver, remove the screw and pull out the shipping bracket.(See
Figure 2-1)
iii). Put the shipping bracket into the use position with the short side extending into the Scanner
base and secure it with the screw.(See Figure 2-2)
iv). Carefully place the Scanner back into its normal position.


