


19
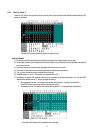
[Switching Via Mouse]
The mouse may also be used to control the OSD (instead of the keyboard):
1). Scroll the mouse up & down to select a host (channel) on the left side of the OSD.
2). If a cascade-connected channel is selected, the state of the selected slave device is shown on the right side
of the OSD.
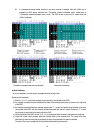
3). If a cascade-connected channel is selected, pressing the right mouse key causes control to switch to the right
(slave) side of the OSD, with the currently selected cascaded host shown in purple. Press the left mouse key
to return control to the left (master) side of the OSD.
4). On the right side of the OSD, scroll the mouse up & down as before to select a cascaded host (channel).
5) Press the center mouse key to actually effect the console switch to the selected host. The name of the host
switched to is shown at the top-left of the screen for about 3 seconds after the switch is effected.
[Direct Switching Via Keyboard]
4/8-port KVM switch (for the 4-port device, read “8” as “4”):
Use the number keys <1>~<8>.
For a cascaded setup, first use the number keys <1>~<8> to select a master-side channel, then use the function
keys <F1>~<F8> to select a slave-side port.
Switching occurs immediately after the appropriate keys are pressed, and the OSD reverts to the normal
console (Hot Key Mode is finished).
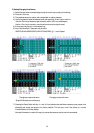
When selecting a port in a cascaded connection, select the port on the master side firstly.
Then, select and switch to the port on the slave side.
[Direct Switching Via Host Selector Buttons]
Press the Selector Button “1”~”8” on the switch device’s console panel to select a host.
To select a cascaded host, press the Selector Button “1”~”8” on the slave KVM device’s console panel.
Switching occurs immediately after the selector button is pressed, and the OSD reverts to the normal console
(Hot Key Mode is finished).
[Auto Scan Mode]
Pressing the keyboard’s <0> key, starts the console screen switching each time the “Auto Scan Interval” elapses,
with the Select LEDs to switch to a slow blink.
The switching interval (Auto Scan Interval) may be adjusted by pressing the <?> cursor key to make it faster
(shorter) and the <?> cursor key to make it slower (longer).
Allowed Auto Scan Intervals are: 3, 5, 10 (default), 20, 40 and 60 seconds
The new Auto Scan Interval is shown on the OSD for 3 seconds.
Hosts that are powered OFF are skipped. No normal keyboard or mouse input is accepted while the Auto Scan
Mode is running.
To return to Hot Key Mode, the Auto Scan Mode must first be cancelled.
Auto Scan Mode may be cancelled as follows:
<Enter> key: Console switches to the currently displayed screen (host).
<Esc> key: Console reverts to the host active before Auto Scan Mode was entered.