


11
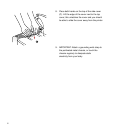
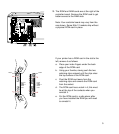
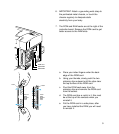
11. Remove the grounding wrist strap from the
printer (if necessary), and reinstall the printer’s
side cover. Don’t tighten the thumbscrews. Turn
on the printer and wait to see if the control
panel shows the “Ready” message. If it does,
turn the printer off and go on to the next step.
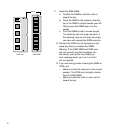
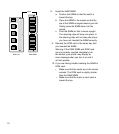
• If the “Ready” message doesn’t appear,
turn off the printer and remove the cover.
Gently try to rock the ROM card and
SIMMs. If they are inserted correctly, they
should not move. Carry out steps 11, 12
and 13 again, replace the cover and turn
the printer on.
• If the “Ready” message still doesn’t appear,
and you are confident that you have
installed the ROM card and SIMM correctly,
contact GCC Technical Support at
781.276.8620 (U.S. only; outside the U.S.
see back cover), www.gcctech.com, or your
authorized GCC dealer.
12. If the printer is ready, tighten the thumbscrews
(at the rear of the side cover) by hand. Make
certain that the printer is switched off. Reinstall
the interface cables (if necessary, insert the
parallel port plug first).
13. Turn the printer on again. If the “Ready”
message shows in the control panel, the
physical installation succeeded. Now confirm
the installation and update the printer driver on
all computers that use this printer. See Section
4 of this guide.