


05-4558A01, Rev. C MDS Mercury Series Startup Guide
7
NOTE:
Using
Configuration Scripts
under the
Maintenance/Tools
menu will aid in uniformly configuring multiple units. See the
Mercury Reference Manual
for details.
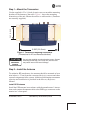
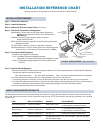
Step 5—Connect the Data Equipment
Connect Ethernet-compatible data equipment to the unit’s
LAN
port
(10/100 BaseT), or one of the serial ports, depending on the capability
of your transceiver.
Use a straight-through Ethernet cable to connect the
LAN
port
to a hub
or switch, and a crossover cable to connect it directly to an Ethernet
station (PC, PLC, RTU).
Step 6—Check for Normal Operation
This step verifies the proper operation of wireless communications
between an Access Point and its associated Remotes.
At All Units...
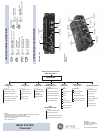
Observe the transceiver’s LED panel (See
Installation Setup Chart
)
for the proper indications. In a normally operating system, the radio
will typically become associated in about two minutes from start-up.
At the Access Point...
a. If the Access Point unit is the first unit you are installing, send
a
PING
command to it through the
LAN
port. This verifies basic
LAN
connectivity.
b. If you have already installed a Remote unit, try sending a
PING
to that unit through the Menu System
PING
utility or a device
connected to the unit on the same subnet.
At Remotes...
a. Look for the
LINK
LED to turn on and stay on. This indicates
the unit has successfully associated with the network’s Access
Point. (The association process may take up to 30 seconds.)
b. Check the
Starting Information
screen for the
Device Status
(also known as Connection Status). It will show one of the fol-
lowing:
Initializing
—This is the first phase after boot-up.