


GE Zenith Controls 13
■
ZBTS / ZBTSD Operation and Maintenance Manual (71R-4000A)
Accessory Definitions
(cont’d)
UMD
Universal Motor Load Disconnect Circuit: Auxiliary
Contact opens 0-60 seconds prior to transfer in either
direction, re-closes after transfer. Can be configured by
end user for Pre-transfer, Post-transfer, or both.
VI
Voltage Imbalance (Three Phase)
For a three phase source, this feature monitors phase
voltage ratios based on a selected range within a
selected time window. Should any phase fall below the
selected lower window limit or exceed the selected
higher window limit within the selected time frame,
the controller initiates transfer to the other source.
Range: 5% to 20% of Nominal voltage,
10 to 30 seconds window, user adjustable.
Resolution: 1% Increments
Minimum Differential: 2% between “Fail”
and “Restore” settings.
Factory default: 10% “Fail”, 8% “Restore”, 30 Seconds.
See CFG Menu page 17 to configure ON or OFF.
See SET Menu page 18 to set Percentage and time
windows
W
Time Delay (S2) Source 2 Stable Timer. To delay trans-
fer to Source 2. Adjustable 0-5 minutes in 1 second
increments. Standard setting is 1 second. Adjust via SET
menu (see page 18)
YEN
Bypass Timers Key utilizing Keypad. When applicable,
the system prompts the user to press a button to bypass
(T) or (W) Timers should the user so desires.
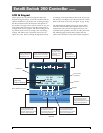
ZNET
Network Communications Interface Card
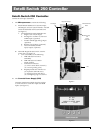
How to Set the System Clock
How to Set the System Clock
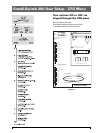
Set System Clock, time and date
· If the clock is not set, the display will show
SET SYSTEM CLOCK on the second line
of the S1 OK screen.
· The S1 OK screen will show time (hours and
minutes) on the second line if the system clock
has been set. (Date on third line)
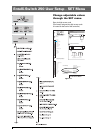
Setting the System Clock
(Start from S1 OK screen)
1. Remove battery protective white plastic strip
near P relay. *
2. Press MORE then press SET.
3. Press MORE and scroll to SET SYSTEM CLOCK
using the MORE key.
4. Press SEL.
5. ENTER ACCESS CODE located on the white label
on the back of the controller.
6. Press SEL.
7. Use the up and down keys to change the hour value.
8. Press SAVE (this will enter this value and move
cursor to minutes).
9. Use the up and down keys to change the minutes.
10.Press SAVE (this will enter this value and move
cursor to month).
11.Use the up and down key up to change the month.
12.Press SAVE (This will enter this value and complete
the clock setting).
13.Use the up and down keys to change the date.
14.Press SAVE (this will enter this value and move
cursor to year).
15.Use the up and down keys to change year.
16.Press SAVE (this will enter this value and
compete the clock setting).
17.To edit settings, press SEL and repeat steps 6-16.
18.If the setting is satisfactory, press MORE
(unit then returns to the SET menu then
press BACK, then ESC.)
* Replacement battery part #K-4100
Battery will last 5 years and provides power to retain clock
function only (Controller functions without battery).