


Page 4
14540
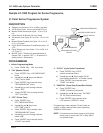
LC-1000 Lube System Controller
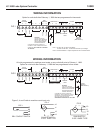
OPERATION
When power is applied, the green “POWER LED”lights
and the LC-1000 counts down alternately from the
programmed “OFF/ON” Times/Counts to zero.
In the “ON” (Monitor) mode, the ” PUMP LED” lights.
The pump is activated and both the “ON and “RUN”
icons are displayed. If the programmed number of
cycle switch transitions (1/2 cycles) are received be-
fore expiration of the “ON” (Monitor) period, the PUMP
OUTPUT, “PUMP” LED, “ON” and “RUN” icons turn
off and the “OFF” icon will display. If the programmed
number of cycle switch transitions (1/2 cycles) are
not received before expiration of the “ON” (Monitor)
period, a “Fault” will be registered. This suspends
pump operation, turns off the ” PUMP” LED, the “ON
and “RUN” icons, turns on the red “FAULT” LED and
closes the fault output contacts.
If a pulsed output to the pump is required, a “PUMP
ON” time may be programmed from 0 to 99 seconds.
Setting this value to zero will provide a steady state
output. “PUMP OFF” is fi xed at 3 seconds.
The “RUN” icon will display anytime the pump out-
put is energized. During pulsed pump operation, the
“RUN” icon will fl ash on and off in sequence with the
pump. During continuous running, the “RUN” icon will
not fl ash.
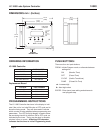
The Controller is programmed to retain the Time/Count
in memory when power is turned off. This feature pre-
vents excessive lubrication in start/stop applications
and retains information for cycle to be completed when
power is restored.
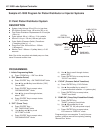
CHANGING SETTINGS
From the Timer display mode, pressing the “PRGM”
button will allow you to review or change between the
set “ON” (Monitor), “OFF”, “CYCLE, “PUMP” (Pulsed
On Time) and “DISPLAY” modes. When in the pro-
gramming mode, the icons/digits will blink. When in
the display mode, the icons/digits do not blink.
1. To set a new “ON” (Monitor) Time/Count, press
the “PRGM” key until the “ON” icon blinks. The
current “ON” (Monitor) Time/Count will be
displayed.
a) Press the “ENTER” key. The “ON” (Monitor)
Time/Count digit will blink.
b) Change the value using the S key and X
key.
c) Press the “ENTER” key to accept the new
value. The “SEC/MIN/HR/CNT” icon will blink
d) Press “ENTER” to accept the time base or the
S key to scroll through the timing choices.
e) Press “ENTER” to complete the process (Note:
Monitor period is normally set 2 times the
actual time required for the pump to satisfy the
system cycle requirements).
2. The “OFF” icon will now be blinking.
a) Repeat above process until all “OFF”
options have been programmed.
b) Press “ENTER” to accept the new values.
3. The “CYCLE” icon will now be blinking
a) Press “ENTER” and the cycle value
(1/2 cycles) will blink.
b) Using the S and X keys set the cycle
value as follows:
Series Progressive: ...............02 (1 divider cycle),
04 (2 divider cycles), 06 (3 divider cycles), etc.
Dual Line: ................. 01 (half cycle) 02 (full cycle)
Piston Distributor or Injector: .........................01
c) Press “ENTER” to register the new value.
4. The “PUMP” icon will now blink.
a) Press “ENTER” again and the pump
pulsed “ON” time will blink.
b) Using the S key and X key, set the value
(seconds) as follows:
Self-Cycling Pump
(Motor Driven, or Reciprocating Barrel): ......00
Single Shot Pump
(Piston Distributor, or Injector): ...................00
Single Shot Pump
(Recycle for Series Progressive): ........03 to 10
c) Press "ENTER" to accept the new values.
NOTE: In the Recycle mode, PUMP “OFF” time is
fi xed at 3 seconds. Press “ENTER” to register
the new value and return to the “DISPLAY”
mode.
NOTE: Scrolling through the modes using the“PRGM”
key only will allow the review of the current
settings without changing any of the values or
timing. It is recommended that programming
not be attempted while a lube cycle is in
process. After making any change in settings,
activate a manual run to initiate the change.
NOTE: Programming examples for specifi c types of
systems are shown on pages 5, 6 and 7.
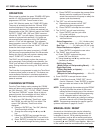
MANUAL RUN / RESET
A manual-run lubrication cycle may be initiated by
pressing the manual run button, located on the left
underside of the unit, OR by shorting terminals 14
and 15 together, such as with a remote push-button
momentary switch. Manual run may also be initiated
by pressing S and "ENTER" keys together. Manul run
is also used to reset the controlelr and to clear faults.