


65
Paw Carrier (Paw Active)
(HP Authorized Service Providers Only)
Required Equipment
• Appropriate ESD station
• Torx #6 screwdriver
• Two small flat tip screwdrivers (or similar prying devices)
• Probe
Removal Procedure
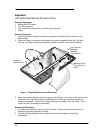
1. Follow the Logic Board PCA Removal Procedure.
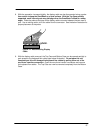
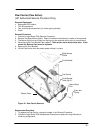
2. Remove the Mylar Mouse Shield. Refer to the below illustration for location of components.
3. The Mouse Eject Arm and Eject Arm Spring may be removed at this point for convenience.
4. Gently bend the Pivot Bracket Tabs upward. Take caution not to break these tabs. If this
occurs the Bottom Case must be replaced.
5. Remove the Pivot Bracket.
6. Lift the Paw Carrier from the plastic posts holding it in place.
Replacement Procedure
1. To replace the Paw Carrier, reverse the steps in the Removal Procedure.
2. Follow the Logic Board PCA Replacement Procedure to replace the Logic Board and
remaining components.
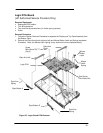
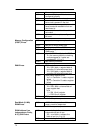
Figure 24 - Paw Carrier Removal
Mylar Mouse
Shield
Pivot Bracket
Paw Carrier
Mouse Eject
Arm
Eject Arm
Spring
Bottom Case
Pivot Bracket
Tabs (Qty 2)