


View and print network settings
You can display a summary of the network settings on the printer control panel or the HP software
that came with the printer. You can print a more detailed network configuration page, which lists
all of the important network settings such as the IP address, link speed, DNS, and mDNS. For
more information, see
Understand the network configuration page (HP Officejet 4620 e-All-in-One
series).
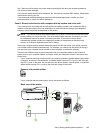
Turn the wireless radio on and off
The wireless radio is on by default, as indicated by the blue light on the front of the printer. In
order to stay connected to a wireless network, the radio must stay on. However, if you have
a USB connection, the radio is not used. In this case you might want to turn the radio off.
1.
Press the
(Wireless) button, and then, using the buttons on the right, scroll to and select
Wireless Settings.
2. Select Wireless: On/Off, and then select On to turn on the radio, or Off to turn off the radio.
Change advanced network settings
CAUTION: Network settings are provided for your convenience. However, unless you are an
advanced user, you should not change some of these settings (such as the link speed, IP
settings, default gateway, and firewall settings).
This section contains the following topics:
• View IP settings
•
Change IP settings
•
Reset network settings
View IP settings
To view the IP address of the printer:
• Print the network configuration page. For more information, see Understand the network
configuration page (HP Officejet 4620 e-All-in-One series).
• Open the HP software (Windows), double-click Estimated Ink Levels, click the Device
Information tab. The IP address is listed in the Network Information section.
Change IP settings
The default IP setting for the IP settings is Automatic, which sets the IP settings automatically.
However, if you are an advanced user, you might want to manually change settings such as the IP
address, subnet mask, or the default gateway.
CAUTION: Be careful when manually assigning an IP address. If you enter an invalid IP
address during the installation, your network components cannot connect with the printer.
1.
On the printer control panel, press the
(Wireless) button.
2. Using the buttons on the right, scroll to and select Advanced Setup, and then select IP
Settings.
3. A message appears warning that changing the IP address removes the printer from the
network. Press the button to the right of OK to continue.
4. Automatic is selected by default. To change the settings manually, select Manual, and then
enter the appropriate information for the following settings:
• IP Address
• Subnet Mask
Change advanced network settings 203