


1. Change the directory to the lib directory, which contains the JDBC driver JAR file:
• On Windows, enter this command:
cd jdbc-installation-directory\lib
jdbc-installation-directory is the directory where you installed the JDBC
driver.
• On Linux or UNIX, enter this command:
cd jdbc-installation-directory/lib
jdbc-installation-directory is the directory where you installed the JDBC
driver.
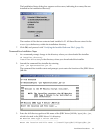
2. Enter this command to return version information:
java -jar hpt4jdbc.jar
For example:
C:\>cd install\hpt4jdbc\lib
C:\install\hpt4jdbc\lib>java -jar hpt4jdbc.jar
T1249_N24_AAK(R2.1)_11MAY07_HP_JDBCT4_2007_04_05
C:\install\hpt4jdbc\lib>
If the JAR file is inaccessible or the returned version is not supported, see “Installing the JDBC
Driver” (page 26).
Installing Perl or Python
If you plan to use Perl or Python scripts with Neoview Script, verify that you have Perl or Python
installed on the client workstation. Neoview Script supports these versions of Perl and Python:
• Perl version 5.6.1
• Python version 2.3.4
If you do not have Perl or Python, download it from any open source software provider. You
can perform this installation procedure anytime before or after installing Neoview Script.
NOTE: Neoview Script provides a beta version of enhanced support for Perl and Python
programs. This beta version requires Jython (for Python programs) and a different version of
Perl to be installed on the client workstation. For more information, see the README in the
Neoview Script samples directory.
Installation Procedures
NOTE: Before following the installation procedures, you must install the Neoview JDBC Type
4 Driver on the client workstation. For more information, see “Preinstallation Procedures”
(page 23).
• “Downloading the Installer” (page 27)
• “Verifying the Version of the Installer File” (page 28)
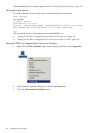
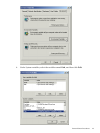
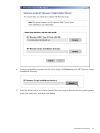
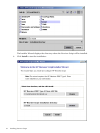
• “Running the Installer” (page 28)
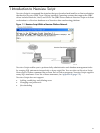
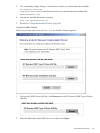
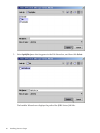
Downloading the Installer
The Neoview Script software is available as a downloadable installer file, hpnvsInstaller.jar,
on the Software Depot site.
Installation Procedures 27