


2 Installation
Introduction
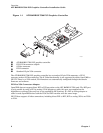
This chapter provides information on unpacking the graphic controller and installing the ATI
RADEON 7500 PCI graphics controller module in a supported HP product.
Unpacking
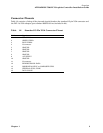
The graphics option hardware is packaged in a single carton that contains one graphic controller and
one installation guide.
Qty Description Part Number
1 ATI RADEON Graphics Controller, 64MB PCI AB551A
1 ATI RADEON Installation Guide AB551-96002
1 ESD strap kit A3024-80004
Installation Procedure
CAUTION: Static electricity can damage sensitive electronic components. When handling
your graphics option, use an anti-static wrist strap that is connected to a
grounded surface on your computer system.
NOTE: Before installing the module, check your monitor specification for signal compatibility and
supported features offered by the ATI RADEON 7500 PCI graphics controllers.
The following section describes how to install the ATI RADEON 7500 PCI graphics controller. To install
the module, perform the following steps:
1. Perform a normal power-down of your computer system and disconnect the monitor cable.
2. Disconnect all AC power cables from the wall outlet (or turn off the circuit breakers if applicable to
your system) to remove power from the system.
3. Remove the cover from your computer (refer to your system documentation).
4. Put on an anti-static wrist strap.
5. If your computer has an existing graphics module, remove the screw that secures it and then
remove the module.
6. The slot to be selected depends on the graphic controller you are about to install. If your system had
a previously installed graphics option, you can use that expansion slot. Remove the slot cover if you
are using a new slot. Refer to your system owner’s guide for information about graphics option slots.
Chapter 2 5