


Processor
NOTE: All processor spare part kits include replacement thermal material, including thermal grease
and pads.
Description Spare part number
Intel Core i7 processors, Quad Core
2720QM, 2.2-GHz (turbo up to 3.3-GHz) processor with 6-MB L3 cache (includes thermal grease) 631254-005
2630QM, 2.0-GHz (turbo up to 2.9-GHz) processor with 6-MB L3 cache (includes thermal grease) 635501-005
Intel Core i7 processor, Dual Core
2620M, 2.7-GHz (turbo up to 3.4-GHz) processor with 4-MB L3 cache (includes thermal grease) 631252-005
Intel Core i5 processors, Dual Core
2540M, 2.6-GHz (turbo up to 3.3-GHz) processor with 3-MB L3 cache (includes thermal grease) 631255-005
2520M, 2.5-GHz (turbo up to 3.2-GHz) processor with 3-MB L3 cache (includes thermal grease) 631253-005
2410M, 2.3-GHz (turbo up to 2.9-GHz) processor with 3-MB L3 cache (includes thermal grease) 638039-005
Intel Core i3 processors, Dual Core
2310M, 2.1-GHz processor with 3-MB L3 cache (includes thermal grease)
NOTE: At temperatures above 30⁰ C (86⁰ F), the Intel Core i3-2310M Processor may run at
decreased performance.
638037-005
Intel Celeron processor, Dual Core
B810, 1.6-GHz, with 2-MB L3 cache (includes thermal grease) 646760-005
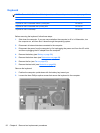
Before removing the processor, follow these steps:
1. Shut down the computer. If you are unsure whether the computer is off or in Hibernation, turn
the computer on, and then shut it down through the operating system.
2. Disconnect all external devices connected to the computer.
3. Disconnect the power from the computer by first unplugging the power cord from the AC outlet,
and then unplugging the AC adapter from the computer.
4. Remove the battery (see
Battery on page 58).
5. Remove the bottom door (see
Bottom door on page 64).
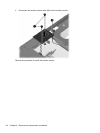
6. Remove the fan (see
Fan on page 85).
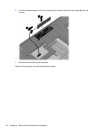
7. Remove the heat sink (see
Heat sink on page 86).
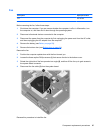
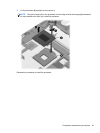
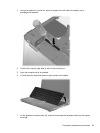
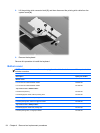
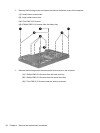
Remove the processor:
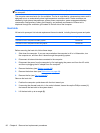
1. Position the computer upside-down with the front toward you.
2. Use a flat-bladed screwdriver to turn the processor locking screw (1) one-half turn
counterclockwise until you hear a click.
90 Chapter 4 Removal and replacement procedures