


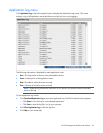

HP UPS Management Module web interface 60
c. Select the time zone from the dropdown box.
d. Enter the number of hours that should pass between each date and time update.
7. If you enabled manual date and time in step 5:
a. Enter the date.
b. Enter the time.
c. Select the date format from the dropdown box.
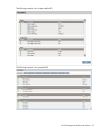
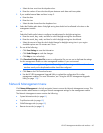
8. Select the Disable radio button if daylight saving time should not be reflected in the time on the
management module.
-or-
Select the Enable radio button to configure time adjustment for daylight saving time:
a. Enter the month, day, week, and time for which daylight saving time should start.
b. Enter the month, day, week, and time for which daylight saving time should end.
c. Select the amount of time the clock should change for daylight saving time in your region.
Available options are 30 minutes and 1 hour.
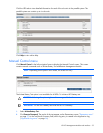
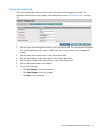
9. Do one of the following:
o Click Save Settings to save the information.
o Click Undo Changes to undo the changes.
o Click Help to view online help.
10. Click Download Configuration File to save a configuration file you can use to duplicate the settings
for this management module on other management modules in your environment.
NOTE: Before saving the configuration file, configure all the settings available on the web
interface exactly as the duplicated modules should be configured.
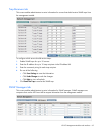
a. Click Save on the File Download screen.
b. Use the HP UPS Management Upgrade Utility to upload the configuration file to other
management modules. For more information, see "Using the HP UPS Management Upgrade
Utility (on page 115)."
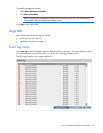
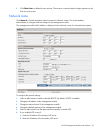
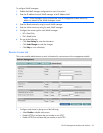
Network Management menu
Click Network Management in the left navigation frame to access the Network Management screen. This
screen enables administrators to configure network management settings for the management module.
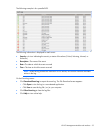
The Network Management screen contains the following:
• System Information tab (on page 61)
• Trap Receivers tab (on page 62)
• SNMP Managers tab (on page 62)
• Remote Access tab (on page 63)