


Installing the HP UPS Power Protection Agent 37
Installing the agent locally or remotely using the Installation
Script method
1. The agent can be installed two ways:
o If installing the software from the HP Infrastructure Management Pack CD, insert the CD into the
CD-ROM drive of the computer. From the console or a terminal window, go to the HP UPS Power
Protection Agent/...HP-UX/Agent subdirectory. Execute the following installation script:
./SetupRA
o If downloading the software from the HP website (http://www.hp.com/go/rackandpower),
follow the instructions on the website to unpack the files. Locate the installation script (SetupRA).
Execute the following script:
./SetupRA
The script installs the agent and requests information to configure the application. Default values or
valid options are shown in brackets following each prompt.
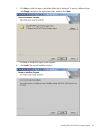
2. To accept the EULA, enter yes.
The script displays: Please enter a server to allow connections from.
3. Enter the IP address of the management module or the path to the serial device. This configuration
ensures that only that particular management module executes commands and operating system
shutdowns on the computer running the agent.
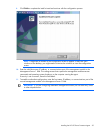
The script displays: Please enter a second server to allow connections from.
4. Enter the IP address of a second management module or the path to the second serial device for
redundant communication.
IMPORTANT: If you are configuring redundant management modules, do not enter an asterisk
to allow any server to connect to the management module.
If you do not want to configure a second connection, enter None.
Installing the agent locally or remotely using the SAM method
1. From a remote machine, enter sam at the command line prompt.
2. Click Software Management.
3. Click Install Software to Local Host.
4. Change the Source Depot Path to a fully qualified path and depot name.
5. Select the agent you are about to install.
6. Select Actions>Install from the top menu, and then click OK and Done.
7. Click OK to analyze the depot file.
8. Click OK to install the depot file.
9. Click Done to complete the installation and continue with the configuration process.
10. Enter /sbin/init.d/DevMan setup in the terminal, and press the Enter key.
The installer launches a separate configuration program.
The script installs the agent and requests information to configure the application. Default values or
valid options are shown in brackets following each prompt.