


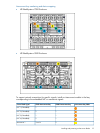
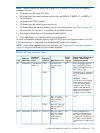
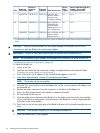


Partner blade half-height bay
number / Server blade
full-height bay number
Partner
blade
support?Blade location rules
Supported
enclosures
Number of
conjoined
blades
Blade Link
part numberClass
N/ANoBays 2&3 with
Monarch blade in
c3000 only2 (BL870c i2)AD399-67011
even bay using
full-height numbering.
N/ANoBays 1&2&3&4 or
5&6&7&8, with
c7000 only4 (BL890c i2)AD399-67006BL4
Monarch blade
defaulting to slot 1 or
slot 5, respectively
N/ANoBays 1&2&3&4 with
Monarch blade
defaulting to slot 1
c3000 only4 (BL890c i2)AD399-67007
1
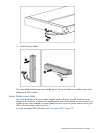
For information on installing the c3000 bay mini-divider, see the HP BladeSystem c3000 Enclosure Setup and Installation
Guide.
CAUTION: Using the incorrect Blade Link can cause damage to the Blade Link and to the
connectors on both the Blade Link and the server blades.
IMPORTANT: Failure to follow bay location rules can prevent server blade power on.
NOTE: The manufacturing part numbers for the Blade Link is located on a sticker on the PCA.
“Upgrading a conjoined configuration” (page 66)
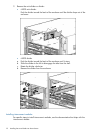
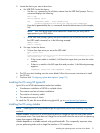
To install the Blade Link:
1. Log on to the OA.
2. Install the first blade into the lowest bay number, this blade becomes the Monarch blade
(“Installing the server blade into the enclosure”).
3. Wait 10 seconds. The IP address of the installed blade appears in the OA.
4. Insert each adjacent blade, waiting 10 seconds between blades.
NOTE: The blades will go into stand-by
5. Using the OA, verify that the rest of the blades that will be conjoined have an IP address and
are powered off.
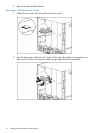
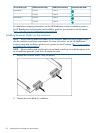
6. Remove the plastic protectors from the connectors on the back of the Blade Link.
7. Push in the blue release latch on the handle to release the handle.
8. Pull the handle all the way out
9. Align the guide pins on the back of the Blade Link to the holes on the front of the server blades.
As you insert the pins into the holes, ensure the face on the Blade Link is evenly aligned parallel
to the face of the server blades.
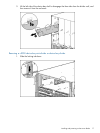
10. Press firmly on the left and right sides of the Blade Link face until the handle naturally starts to
close.
CAUTION: If not properly aligned, you can damage the Blade Link
11. Close the handle when it has engaged.
24 Installing the server blade into the enclosure