


A Troubleshooting
Solving Common Problems
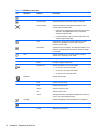
The following table lists possible problems, the possible cause of each problem, and the
recommended solutions.
Problem Possible Cause Solution
Power LED is not on. Monitor is not turned on or
plugged in.
Be sure to press the power button to turn on the
monitor and that the power cord is properly
connected to a grounded power outlet and to the
monitor.
No Plug & Play. Computer is not Plug & Play
compatible.
In order for the Plug & Play feature of the monitor
to work, you need a Plug & Play compatible
computer & video card. Check with your computer
manufacturer. Also check the monitor's video cable
and make sure none of the pins are bent
Make sure the HP monitor driver is installed (HP
monitor drivers are available at
http://www.hp.com
or on the monitor CD if one is provided).
Picture is fuzzy and has ghosting
shadowing problem.
Screen image may need
adjusting.
Adjust the contrast and brightness controls. Make
sure you are not using an extension cable or
switch box. HP recommends plugging the monitor
directly into the video card output connector on the
back of the computer.
Picture bounces, flickers or wave
pattern is present in the picture.
Electrical interference. Move electrical devices that may cause electrical
interference as far away from the monitor as
possible.
Use the maximum refresh rate your monitor is
capable of at the resolution your are using.
Monitor is stuck in active off-mode. An external device connected
to the monitor may be loose
or not connected.
Check the following:
●
The computer power switch should be in the
on position.
● The computer video card should be snugly
seated in its slot.
●
Make sure the monitor's video cable is
properly connected to the computer.
● Inspect the monitor's video cable and make
sure none of the pins are bent.
●
Make sure the computer is operational by
pressing the Caps Lock key on the keyboard
while observing the Caps Lock LED. The LED
should either turn on or off after pressing the
Caps Lock key.
18 Appendix A Troubleshooting