


HP SureStore DAT
Installation Overview (Internal Drives)
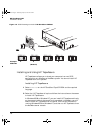
Internal Drives—Installation Overview
Refer to:
Before you start:
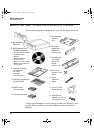
Check the packing list inside this guide. Check system prerequisites.
page 1-2
Step 1: Check the Drive’s SCSI ID
Check the tape drive’s SCSI ID. If necessary change it from the default
of 3 by setting jumpers on the back of the drive.
page 1-6
Step 2: Set the Configuration Switches (UNIX Systems Only)
Check the UNIX configuration switches on the bottom of the drive.
Change the switch settings, if necessary.
page 1-10
Step 3: Prepare the Mounting Bay
page 1-11
Switch off the computer and remove its outer casing. Remove the cover
plate from an empty, 5¼-inch, half-height bays. (Keep the screws.) If
your computer has 3½ inch bays, fit the supplied 5¼ to 3½ conversion
kit to the drive.
Step 4: Attach Mounting Rails
page 1-14
Attach any mounting hardware (rails or tray) necessary for your
computer. In the box you will find mounting rails for use with
HP Kayak/Vectra/Brio/NetServer E-series, a tray for use with HP
NetServer L-series and mounting rails for non-HP systems.
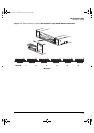
Step 5: Install the Drive
page 1-16
Fit the power cable extension and slide the tape drive into the bay. To
aid fitting cables, do not secure the drive with screws yet.
Step 6: Attach Power and SCSI Cables
page 1-17
Attach a spare power cable from the computer’s internal power supply.
Attach the drive to a spare connector on the SCSI ribbon cable.
Step 7: Secure the Drive
page 1-19
Secure the drive in place with the provided screws. Replace the
computer’s cover and reconnect cables.
On Completion
page 1-20
Power on the system and check the tape drive is operational. Insert the
HP SureStore Tape CD-ROM. It contains drivers, backup software and
many useful utilities. Register your tape drive.
Overview