


b. Print WPS PIN.
Press and hold the Scan button for two seconds.
Wireless test starts.
Wireless test report and Network Configuration report are printed
automatically.
c. Set up wireless connection.
Press and hold the Wireless button for two seconds.
Enter the PIN on a computer for the router.
The Wireless icon and signal strength bar appear solid on successful
configuration of the wireless network.
d. Install software
NOTE: The product begins a timer for approximately two minutes in which the
corresponding button on the networking device needs to be pressed.
Related topics
“
Install the software for a network connection” on page 8
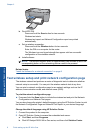
Test wireless setup and print network configuration page
The wireless network test performs a series of diagnostic tests to determine whether
network setup is successful. You can print the wireless network test at any time.
You can print a network configuration page to see network settings such as the IP
address, communication mode, and network name (SSID).
To print the network configuration page
▲ Press and hold the Scan button to initiate the wireless test and print the Network
Configuration and Network Test pages.
You can also change the printer's default language, using the HP Solution Center, to print
the Network Configuration Page and Network Test Report in your desired language.
Change the default language using HP Solution Center
1. Connect the product to the computer.
2. Open HP Solution Center to access the embedded web server.
a. Click Start, and then Programs.
b. Click HP Deskjet F4500 All-in-One series, and then click Solution Center.
Chapter 2
6 Finish setting up the HP All-in-One
Finish setting up the HP All-in-One