


7
3
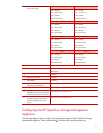
Configuring the HP OpenView Storage Management Appliance
Connect the EVA to the Fibre Channel switches. The F500 supports the cross-cable configuration. Please verify that the
cabling is configured using this supported method.
For more information regarding the F500, please visit
http://h18000.www1.hp.com/solutions/enterprise/highavailability/microsoft/haf500/index-eva.html
Power on the EVA subsystem.
Enter the WWID of the subsystem via the Operator Control Panel (OCP).
Power on the HP OpenView Storage Management Appliance. Refer to the HP OpenView Storage Management
Appliance documentation for detailed installation and configuration instructions.
http://h18000.www1.hp.com/products/sanworks/managementappliance/documentation.html
Log into the Storage Management Appliance from any network browser.
Note: The default username and password is administrator.
Install the HP StorageWorks Command View EVA software for the Storage Management Appliance.
Insert the HP StorageWorks Command View EVA CD. Select Application →Installation Services→Install
Products. Select CDROM→Next Step and follow the on-screen instructions to continue.
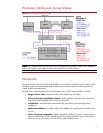
Cable the Storage Management Appliance to the SAN. Refer to figure 1 - hardware cabling diagram on page 3.
Connect the Storage Management Appliance to the ethernet network.
Note: You must have a working network to configure the storage subsystem via the Storage Management Appliance.
Configure the zone for the Storage Management Appliance.
Using telnet or the Fibre Channel switch graphical user interface (GUI), create a Fibre Channel zone that consists of the
WWIDs of the FCAs in the Storage Management Appliance and the WWIDs of the HSV controller ports.
For more information regarding zoning, please refer to the Zoning User’s Guide located at
http://h18004.www1.hp.com/solutions/enterprise/highavailability/whitepapers/ms-eva.html
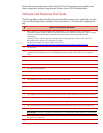
Installing Node 1 Operating System
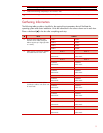
The following table provides a checklist of the operating system installation steps for Node 1. Place a
checkmark (3) in the box after completing each step.
3
Installing Node 1 Operating System
Power on Node 1.
After the array controller initializes, press the F8 key to enter the Option ROM Configuration for Arrays (ORCA).
Create a primary boot partition on the server.
Exit the ORCA utility.
Boot the server with the SmartStart CD in the CD-ROM drive.
Note: The instructions below are for SmartStart 6.x or later. Please refer to SmartStart 5.50 documentation for pre-
Generation 2 servers.
Select the desired language from the Select Language screen.
Follow the SmartStart on-screen instructions. Insert the operating system CD when prompted to complete the installation
process.
Each cluster node requires at least two network adapters—one connected to a public network, and one connected to a
private network.
For the public network connection:
If the network adapter can transmit at multiple speeds, then manually specify a speed
and du
p
lex mode. The s
p
eed for the network ada
p
ter should be hard set
(
manuall
y
set
)
to be the same on all nodes