


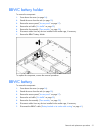

Removal and replacement procedures 26
2. Disconnect all peripheral cables and power cords from the server rear panel.
3. Loosen the thumbscrews that secure the server faceplate to the front of the rack.
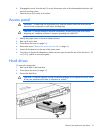
4. Extend the server on the rack rails until the server rail-release latches engage.
WARNING: To reduce the risk of personal injury or equipment damage, be sure that the rack
is adequately stabilized before extending a component from the rack.
WARNING: To reduce the risk of personal injury, be careful when pressing the server rail-
release latches and sliding the server into the rack. The sliding rails could pinch your fingers.
5. After performing the installation or maintenance procedure:
a. Slide the server fully into the rack.
b. Secure the server by tightening the thumbscrews.
6. Connect all peripheral cables and power cords.
Power down the server
WARNING: To reduce the risk of personal injury, electric shock, or damage to the equipment,
remove the power cord to remove power from the server. The front panel Power On/Standby
button does not completely shut off system power. Portions of the power supply and some
internal circuitry remain active until AC power is removed.
IMPORTANT: If installing a hot-plug device, it is not necessary to power down the server.
1. Back up the server data.
2. Shut down the operating system as directed by the operating system documentation.
3. If the server is installed in a rack, press the UID LED button on the front panel. Blue LEDs illuminate on
the front and rear panels of the server.
4. Press the Power On/Standby button to place the server in standby mode. When the server activates
standby power mode, the system power LED changes to amber.
5. If the server is installed in a rack, locate the server by identifying the illuminated rear UID LED button.
6. Disconnect the power cords.
The system is now without power.
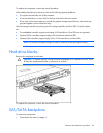
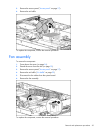
Remove the server from the rack
To remove the server from an HP, Compaq branded, telco, or third-party rack:
1. Power down the server (on page 26).
2. Disconnect all peripheral cables and power cords from the server rear panel.
3. Disconnect the cable management arm, if necessary. For more information, refer to the
documentation that ships with the cable management arm.
4. Loosen the thumbscrews that secure the server faceplate to the front of the rack.
5. Extend the server from the rack (on page 25).