


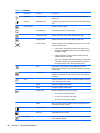


Icon Main Menu Submenu Description
The factory default is Automatic Input Scan
Input Switch Mode NOTE: The Default Video Input must be set to Auto-Detect to
activate functionality of the Input Switch Mode.
Controls the monitor action when the current video input is
removed or enters the power savings mode. Set to:
●
Input Auto-Switching OFF—the monitor takes no action
when the displayed input is removed or enters the power
savings mode
●
Input Auto-Switching ON—the monitor automatically seeks
and displays an active input when the currently displayed
video input is removed or enters the power mode
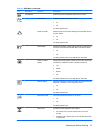
The factory default is Off.
PIP/POP Select Selects the type of secondary window. The choices are:
●
PIP - Picture In Picture—secondary window is displayed as
a small window within the primary window
●
POP - Picture Outside Picture—secondary window is
displayed side by side with the primary window
PIP/POP Source Selects the input source for the PIP/POP window. The choices
are Composite Video, S-Video, and Component Video.
NOTE: All inputs are supported for the main window. however
only Composite, S-Video, and Component inputs are supported
for the secondary window.
PIP Size Selects the size of the PIP window. The choices are Small,
Medium, and Large.
PIP Position Selects the position of the PIP window on the screen. The choices
are Top Left, Top Right, Bottom Right, and Bottom Left.
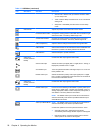
Information Selects and displays important information about the monitor.
Current Settings Provides the current input video mode.
Recommended Settings Provides the recommended resolution mode and refresh rate for
the monitor.
Serial Number Reports the serial number of the monitor. The serial number is
needed if contacting HP technical support.
Version Reports the firmware version of the monitor.
Backlight Hours Reports the total hours of backlight operation.
Factory Reset Returns all OSD menu settings and DDC/CI controls to the factory
default settings, except the Language.
Exit Exits the OSD menu screen.
Table 4-3 OSD Menu (continued)
Adjusting the Monitor Settings 29