


Chapter 7 Rack Mounting the HP Netserver (2-Post)
63
• Circuit Overloading - Ensure the total configuration of equipment in the
rack does not overload the supply circuit. To this end, check the nameplate
ratings on all equipment. Consider the effect of circuit overloading on
overcurrent protection and supply wiring.
• Reliable Earth Grounding - Maintain reliable earth grounding of
rack-mounted equipment. Give particular attention to supply connections that
are not direct connections to the branch circuit (for example, using non-HP
power strips).
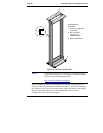
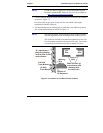
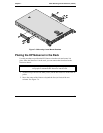
Preparing the Rack
The hole placement on the two columns must be marked before attempting to
mount the HP Netserver chassis. Once the two holes on both columns are marked
correctly, the rails and hardware can be removed from the Netserver chassis and
the new brackets can be mounted on the chassis. Once the brackets are installed
the Netserver can be mounted onto the columns.
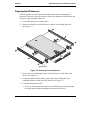
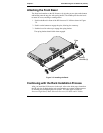
HP Netserver Rack Mount Parts List
Ensure the rack-mounting kit provided with the HP Netserver contains the
following parts:
Table 7-1. Parts for Rack Mount Kit
Quantity Description
2 Flush mount brackets (one left and one right side)
2 Center mount brackets (one left and one right side)
8 Bracket mounting screws (8-32 x ¼ inch, Torx head)
4 Rack mounting screws (12-24 Phillips head)
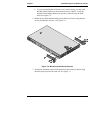
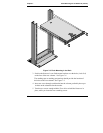
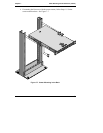
Marking the Rack
Use this section to mark the columns of the 2-post non-HP rack. The brackets
attach to the front side of the two columns for either flush mount or center mount
brackets. The masking tape (or marking pen) is used to identify and mark the
locations on the columns.
CAUTION If other rack components are to be mounted in the rack below
the HP Netserver, install those components before starting to
mount the Netserver.