


10
Setting up
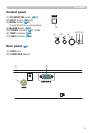
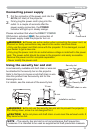
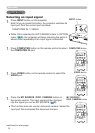
• Be sure to read the manuals for devices before connecting them to
the projector, and make sure that all the devices are suitable to be connected
with this product. Before connecting to a PC, check the signal level, the signal
timing, and the resolution.
- Some signal may need an adapter to input this projector.
- Some PCs have multiple screen display modes that may include some signals
which are not supported by this projector.
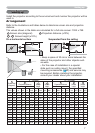
- Although the projector can display signals with resolution up to UXGA
(1600X1200), the signal will be converted to the projector’s panel resolution
before being displayed. The best display performance will be achieved if the
resolutions of the input signal and the projector panel are identical.
• While connecting, make sure that the shape of the cable's connector ts the
port to connect with. And be sure to tighten the screws on connectors with
screws.
• When connecting a laptop PC to the projector, be sure to activate the PC’s
external RGB output. (Set the laptop PC to CRT display or to simultaneous
LCD and CRT display.) For details on how this is done, please refer to the
instruction manual of the corresponding laptop PC.
• When the picture resolution is changed on a PC depending on an input,
automatic adjustment function may take some time and may not be completed.
In this case, you may not be able to see a check box to select “Yes/No” for the
new resolution on Windows. Then the resolution will go back to the original.
It might be recommended to use other CRT or LCD monitors to change the
resolution.
• In some cases, this projector may not display a proper picture or display
any picture on screen. For example, automatic adjustment may not function
correctly with some input signals. An input signal of composite sync or sync on
G may confuse this projector, so the projector may not display a proper picture.
NOTE
About Plug-and-Play capability
Plug-and-Play is a system composed of a PC, its operating system and
peripheral equipment (i.e. display devices). This projector is VESA DDC 2B
compatible. Plug-and-Play can be used by connecting this projector to a PC
that is VESA DDC (display data channel) compatible.
• Take advantage of this feature by connecting a computer cable to the
COMPUTER IN port (DDC 2B compatible). Plug-and-Play may not work
properly if any other type of connection is attempted.
• Please use the standard drivers in your PC as this projector is a Plug-and-
Play monitor.
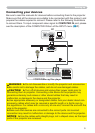
Connecting your devices (continued)